


Blog Wordpress EN
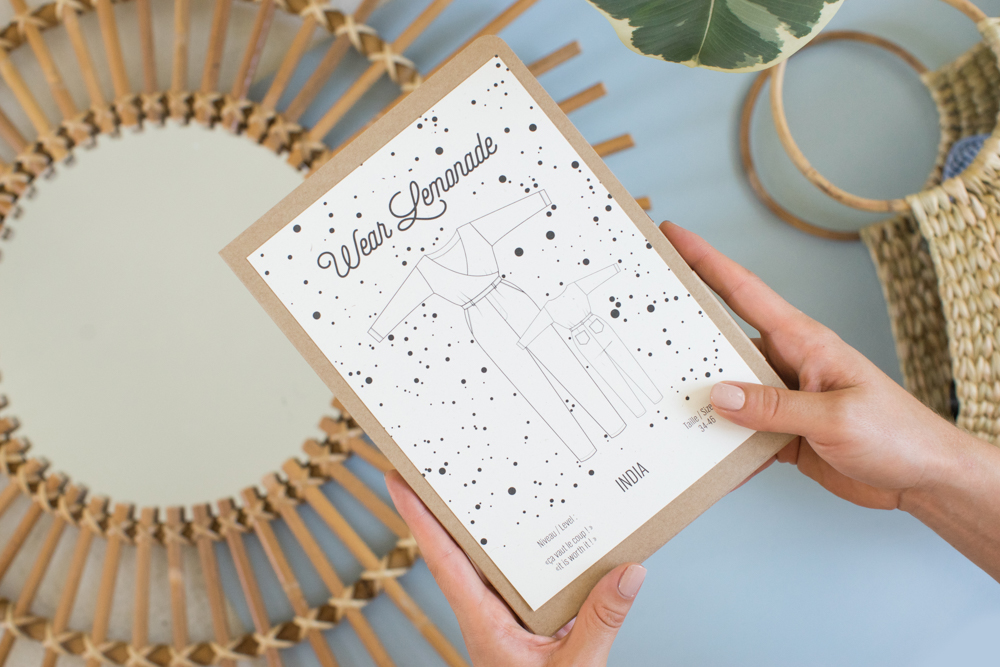
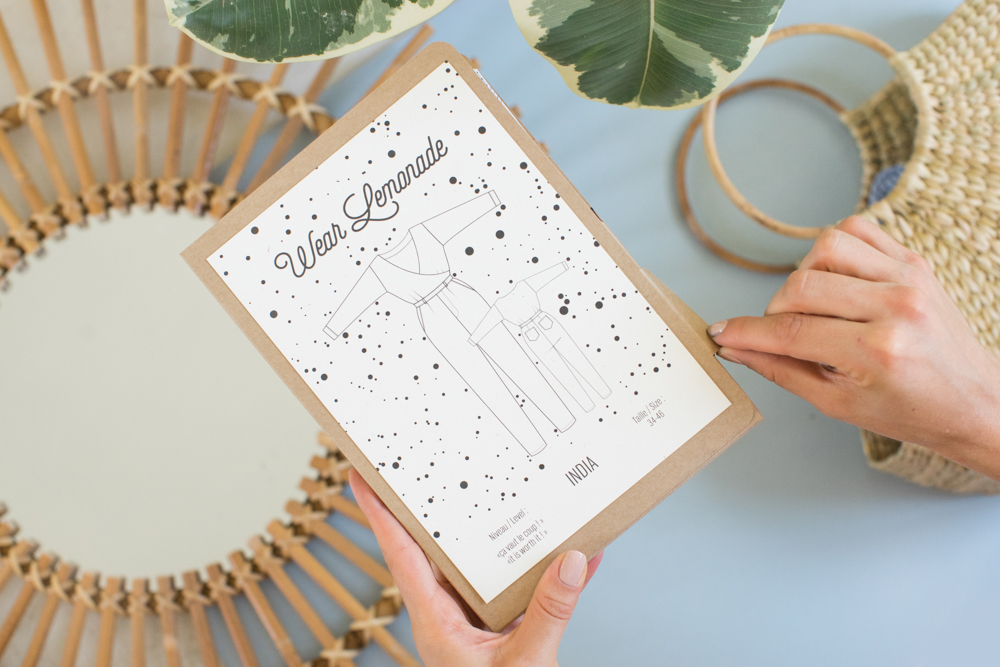
HOW TO SEW AN INDIA JUMPSUIT[:]
Holà everybody!
It’s time to get back to work, why not start with India! Today I’d like to tell you about it, step by step... It’s kind of funny because I just saw my friend Fred, who said: “I watched your last sewing tutorial but I didn’t understand a thing!”. That made me smile... and then I started to wonder if anyone understands me! Am I so into my own little world that I’m only talking to myself? No way! Luckily the lovely Laure, super queen of sewing patterns, is always here to watch over. If I can do it, you can too! I was thinking it might be nice to make a video to show you certain technical sewing terms, for beginners out there who are afraid to start. Kind of like a ’Sewing for Dummies’ to explain the words and phrases used the most often in my videos...
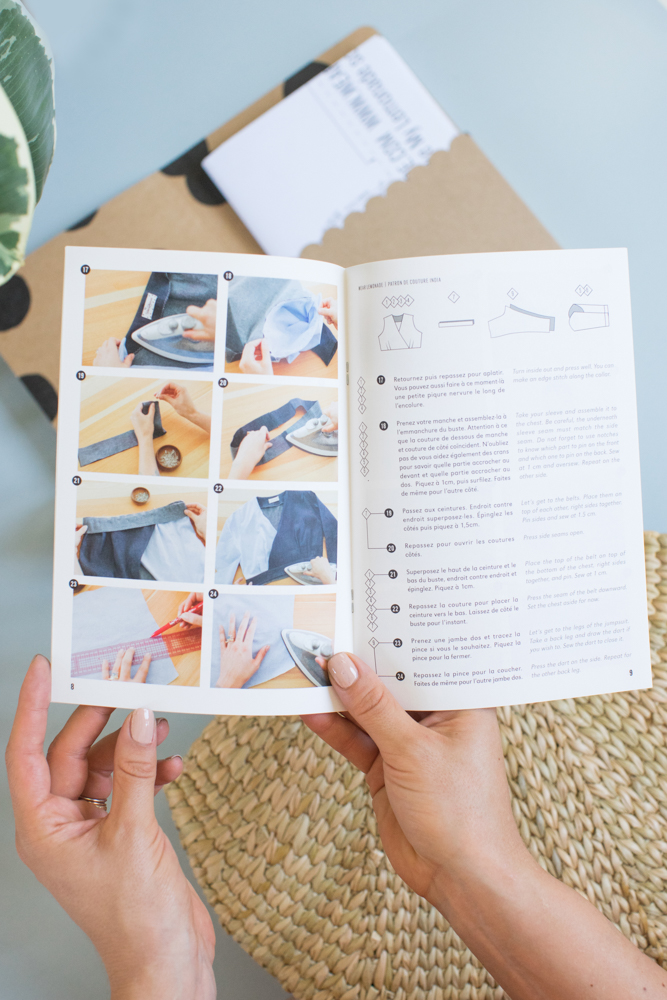
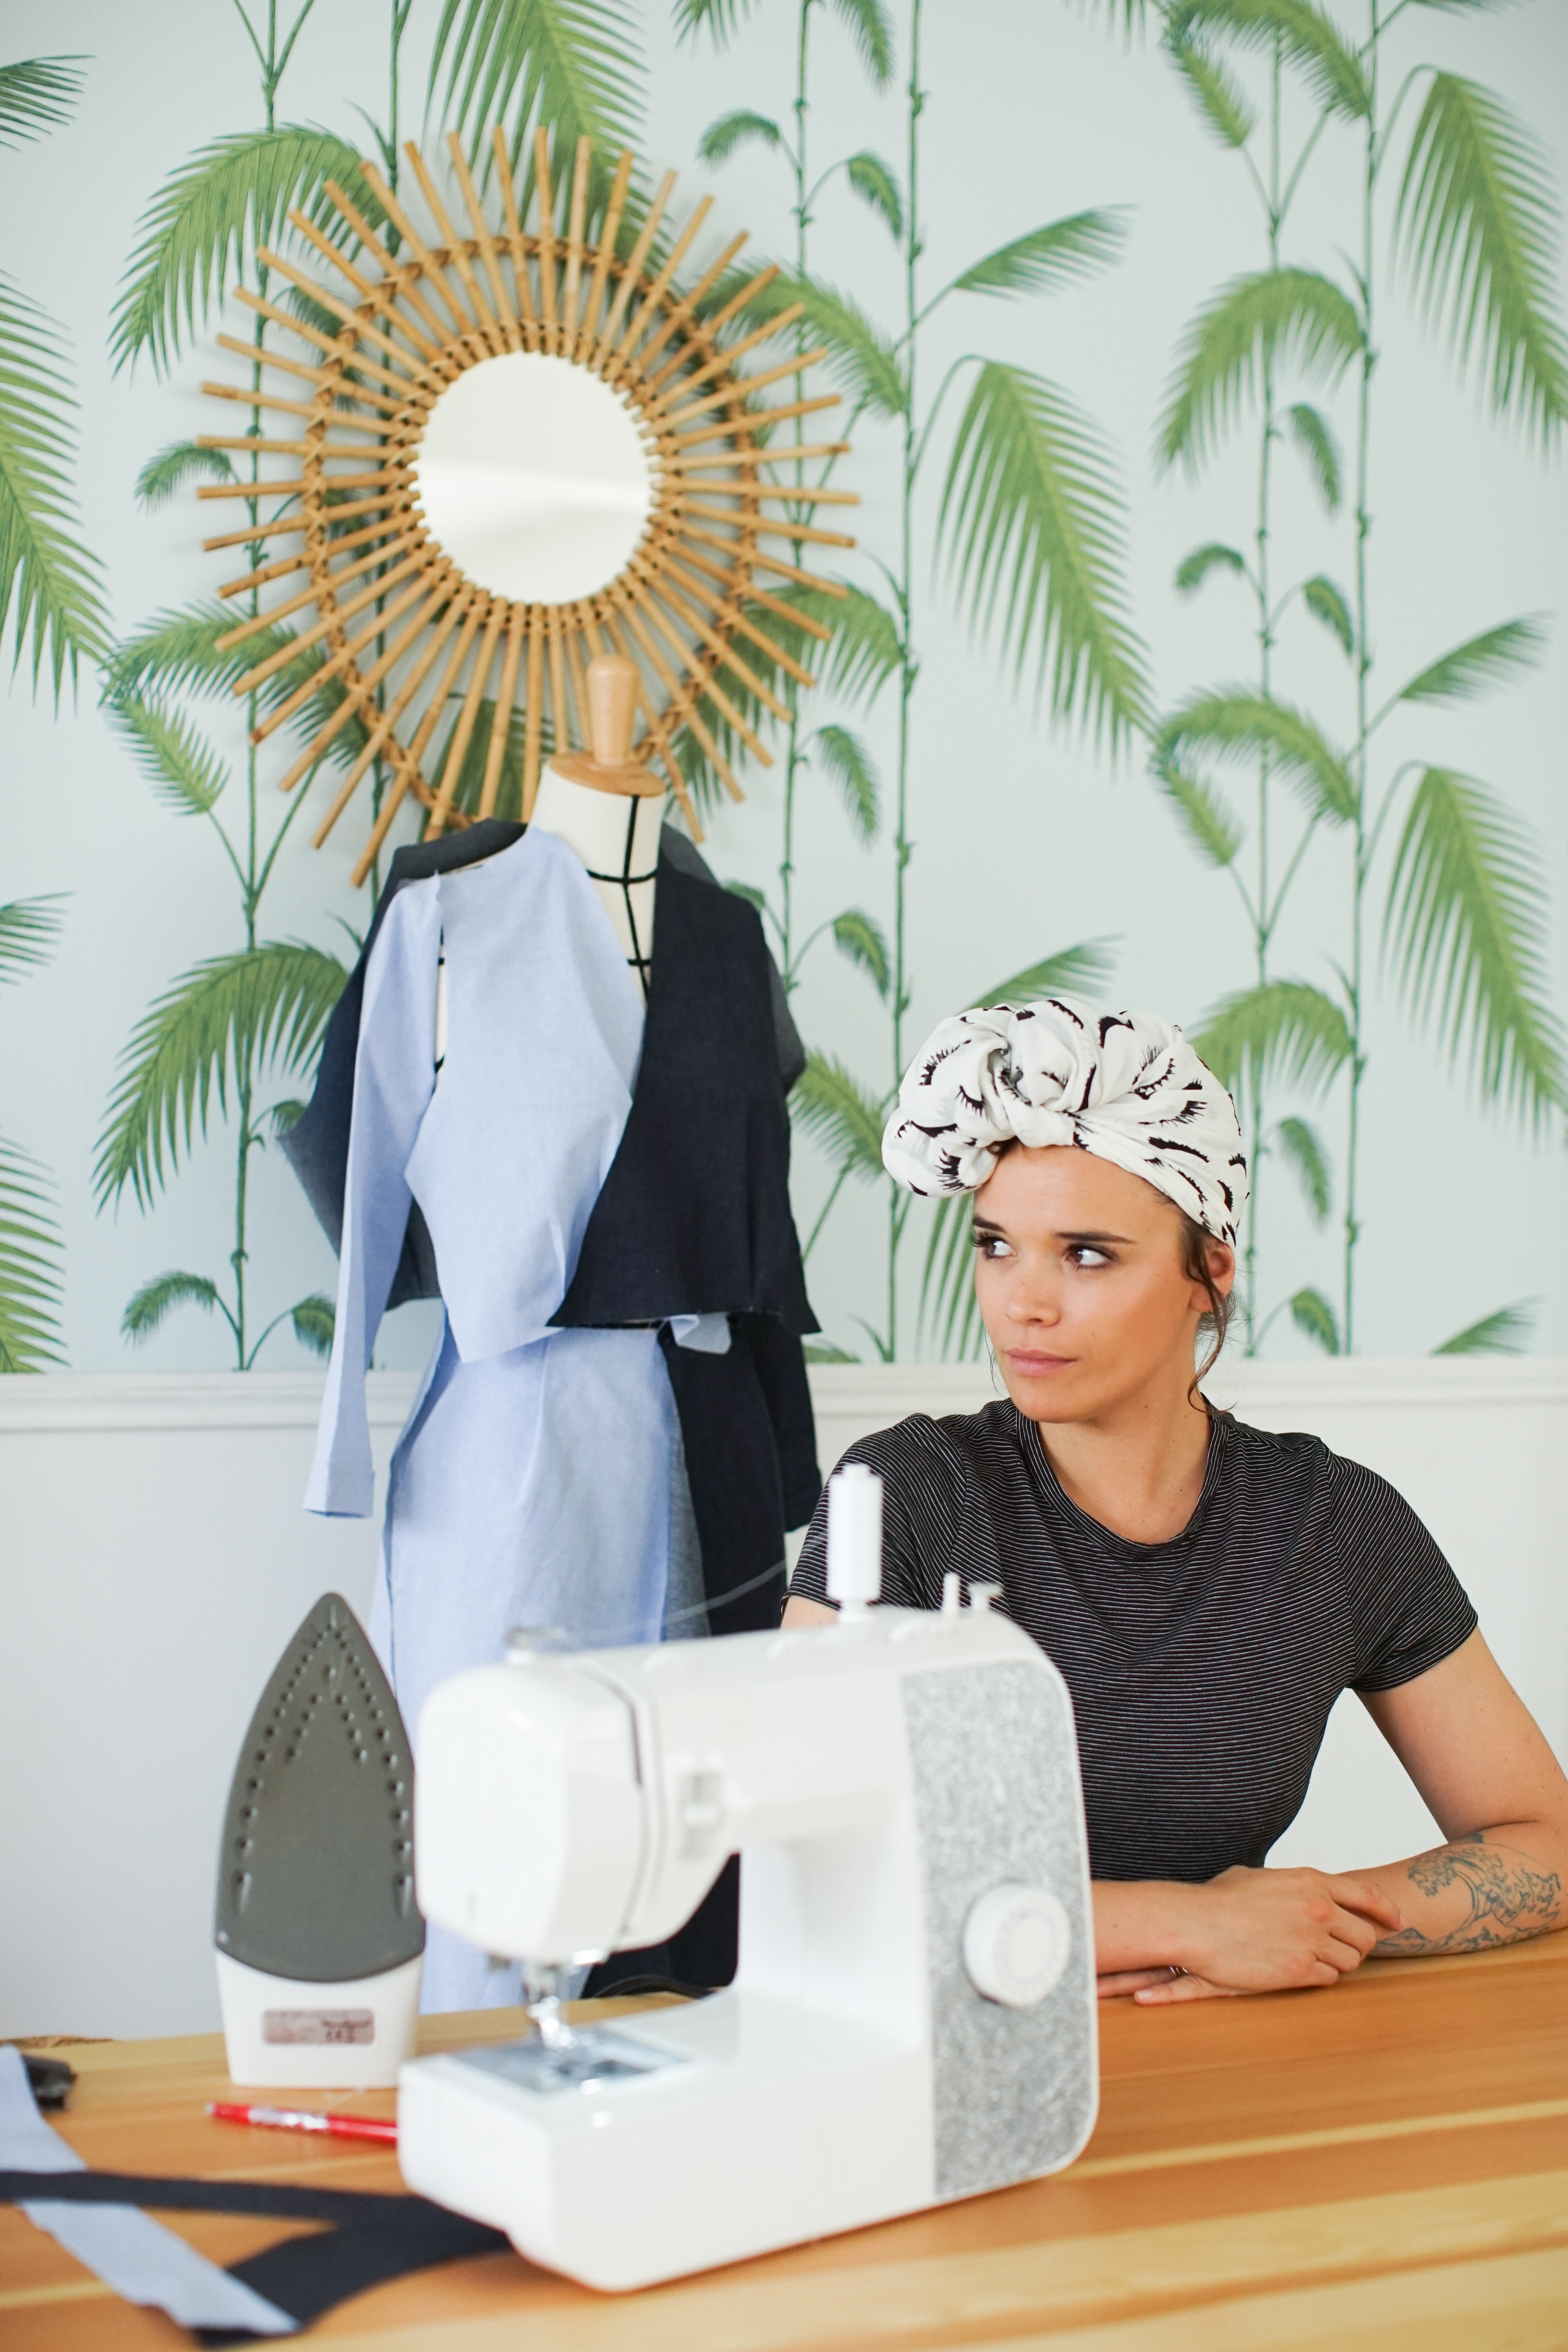
Going back to India, I recommend it for your 3rd or 4th sewing project, not so much for beginners. But then again, if you’re comfortable using a presser foot, I’m sure that with enough ambition, selfconfidence, and patience, nothing is impossible. But seriously, it’s not a huge project, there are a lot of parts and large pieces of fabric, especially for the legs. It may seem a little overwhelming but I promise it’s not a big deal. It’s true that for a first project, it’s a bit difficult... You’ll see that I kind of went crazy picking the colors for my own India jumpsuit... It’s totally Bowiesque... see for yourself in the video below:
Some things to know about India:
- to make it you’ll need 4m of fabric from a bolt 1m45 wide or 4m60 from a bolt 1m10 wide
- 1 “invisible” zipper 40cm long. A color that matches your fabric looks best!
- We suggest making it out of stretchy gabardine, chambray, or light denim, crepe or even viscose or cotton!
- I won’t lie, in order to have the perfect fit, the crossover neckline needs to be a tad snug. So you’ll need to be a little bit flexible to get into your India, but I promise you won’t regret it!
- The paper pattern is available here or in a PDF via the 3, 6, or 12 month subscription here
 Speaking of PDFs, more and more of you are subscribing. This fall, we’re working on your goodies and on another payment system besides PayPal, so everyone can order! Hugs and kisses! See you very soon!
Lisa Banana
Speaking of PDFs, more and more of you are subscribing. This fall, we’re working on your goodies and on another payment system besides PayPal, so everyone can order! Hugs and kisses! See you very soon!
Lisa Banana
 Translated by Whitney Bolin.[:]
OH INDIA![:]
Hello everyone!
It’s officially time to go back to school, to work, to... fall! Is it just me or did summer go by in the blink of an eye? I just got back from an amazing trip in Canada. I’ll tell you all about it soon. But coming back wasn’t easy. All of a sudden it’s like I need for something revolutionary. I want to change everything at the Lemonade Studio, to paint, to move the furniture around. I’d like a fresh start to clear my mind because the upcoming months for the Lemonade Team will be action packed!

I’m not sure if we’ve talked about it yet or not, but when I have work to do, instead of seriously getting down to it, I always end up going back to my apartment, the office, my life. That’s my trick to see things clearly! I’m sure that a lot of people are the same way, they tidy up to get their thoughts organized. But at my house, it gets out of hand, I often involve my friends and my team against their will. For three days, the Lemonade Studio’s been looking like a tornado came through...


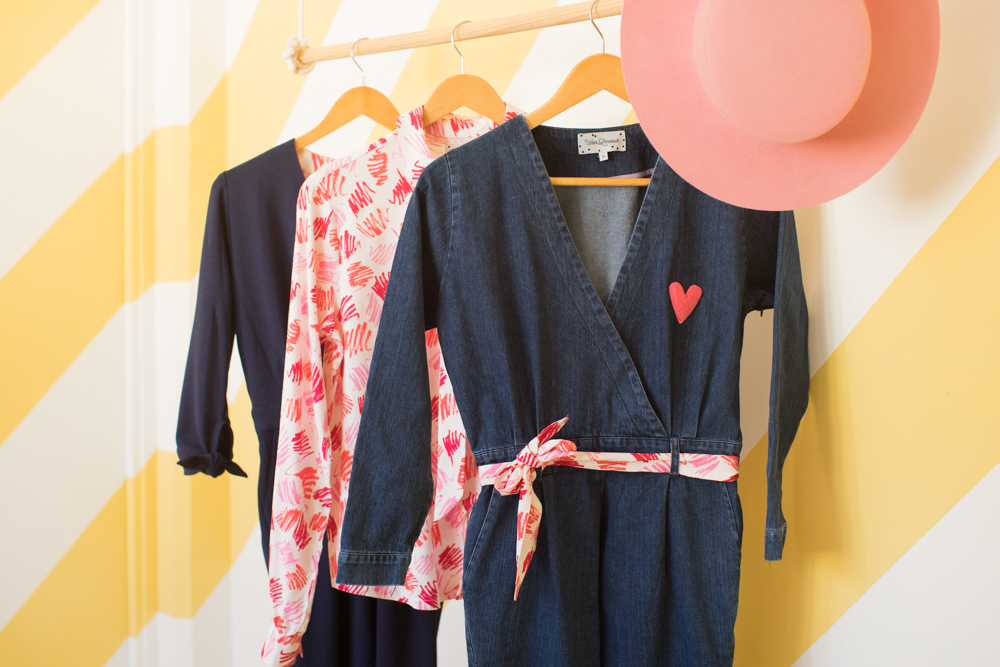
It’s finally the moment you’ve all been waiting for! The India jumpsuit is available in navy crepe fabric and in denim as well as the lipstick patterned Simona blouse with a removable tie! I’m so happy my backtowork uniforms are ready! Good news, our little Wear Lemonade is pairing up with Birchbox this September to help you get back to school and work with a smile on your face! Besides designing the box with colors from the current collection, I selected the products that’ll be inside and made you a gift that’ll last a long time... but I’ll tell you more as soon as it comes out in 5 days...

Going back to India, it’s perfect for fall. The denim’s sometimes casual, like in a sexy worker way, and sometimes chic for going out after work with its’ delicate details on the sleeves. It kind of has a carrot fit. The high waist makes you look slimmer and its’ crossover neckline is flattering on everyone! To tell you the truth, besides boatnecks, I’m in love with crossover necklines... India is great for petites (YEAH!). I’m still in love with those little embroidered hearts!
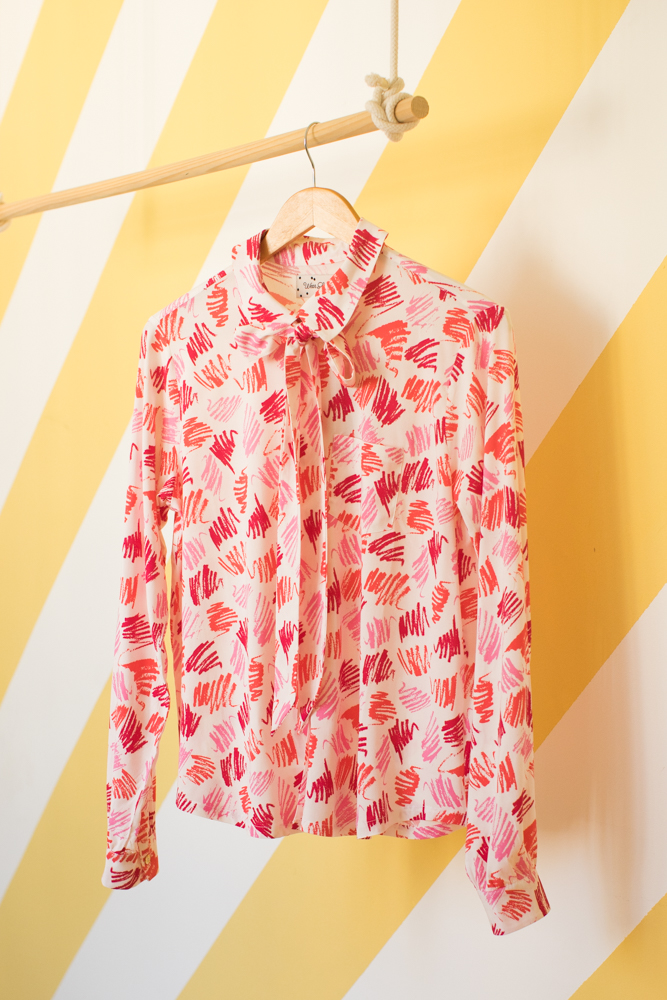

Simona is an experiment; We didn’t really know if you’d like it, so we didn’t make a sewing pattern this season. If you do, it’ll be available for the next collection... in different patterns of course! Simona has a removable tie, underneath the collar is a loop to keep it in place. You can also wear it unbuttoned or button up those precious little golden buttons for a preppy look! Anyways, I’m happy everyone liked the Tara hat... We’ll be sure to make more for the next collection! Hugs and kisses, I’m happy to be back. See you tomorrow for India’s step by step instructions!
Translated by Whitney Bolin
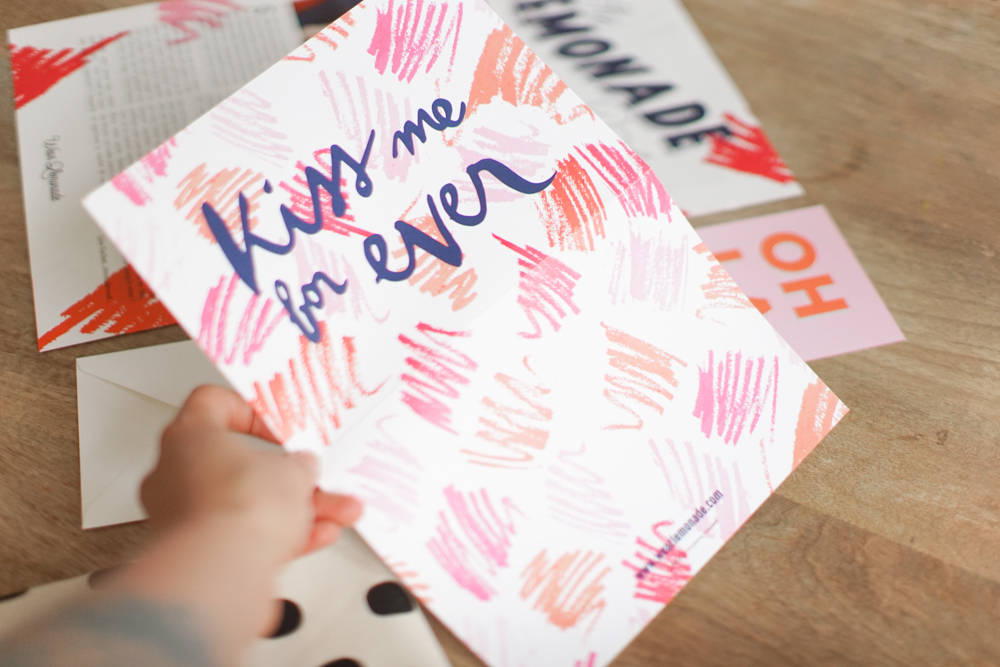
PACKAGE EXPERIENCE[:]
Hello darlings!
This article has been on my mind for quite some time! I thought that what I loved about having my own brand was creating clothes I’ve always wanted to wear, creating a unique world, coming up with crazy photo shoots, seeing you own Wear Lemonade pieces, and recently, along with everything else, I’ve realized that I’ve also been having fun with the whole package experience!
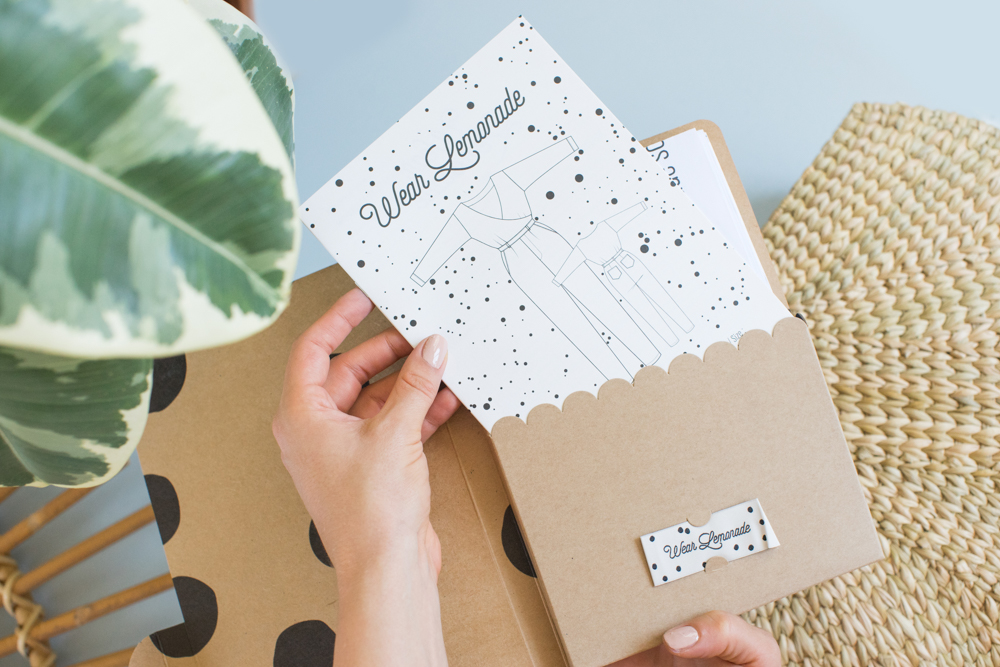
As you know, Wear Lemonade is only sold online, so since there isn’t an actual store to physically go to, I think it’s difficult to completely immerse yourself in our lemony world. So, when you order clothing or fabric, you’ll get little gifts that’ll switch up every trimester in your packages. Kind of like a surprise for every collection: this is the package experience!
I often have to put on the breaks because if it was up to me, half of the price of shipping would go to gifts...
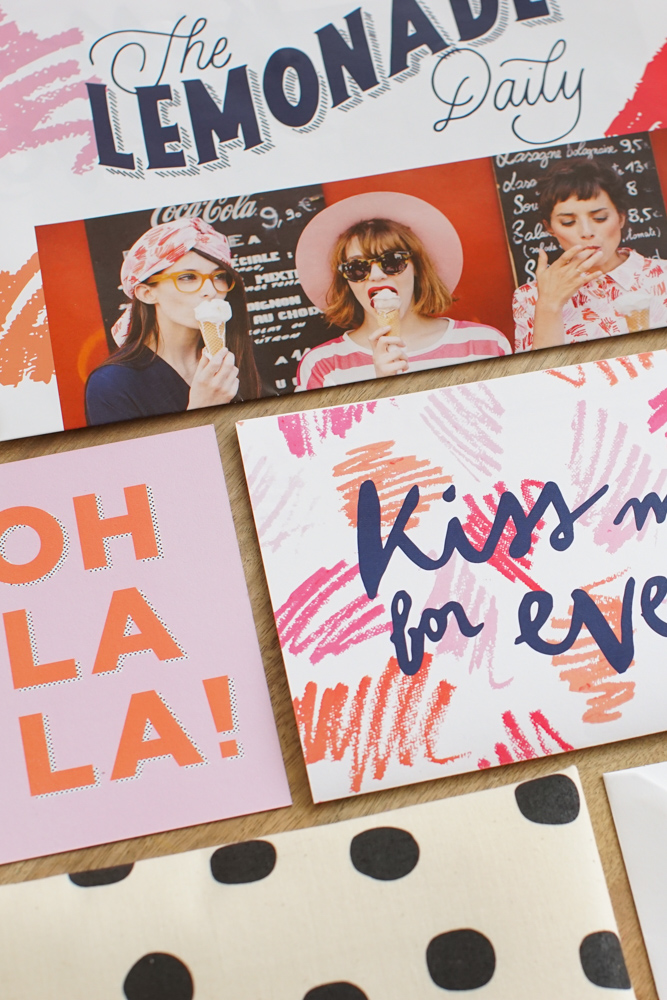
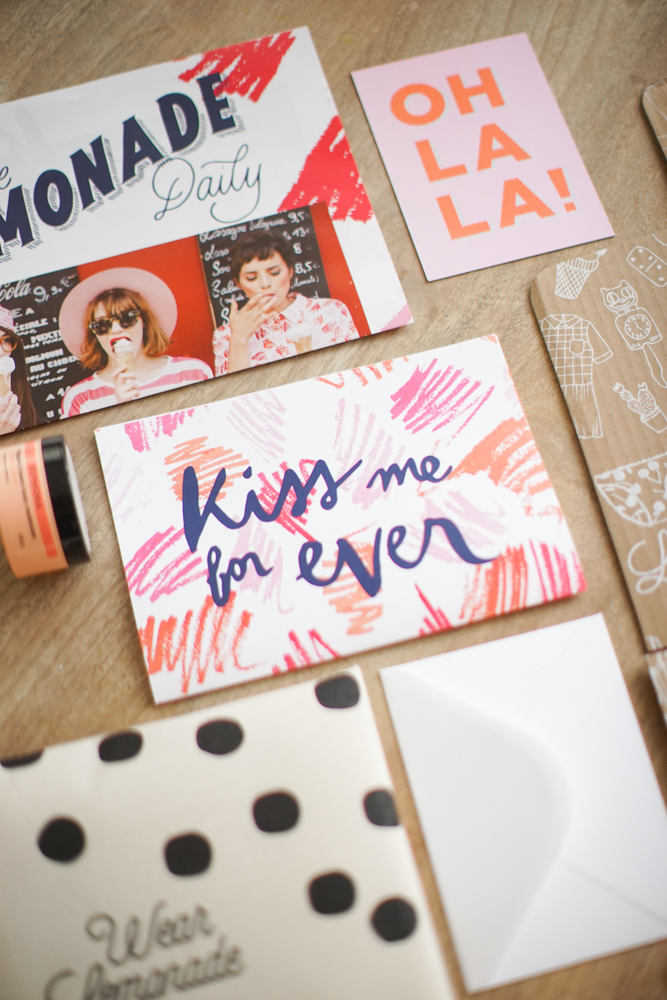
We really hit it off. They’re the ones who now prepare your packages and take care of our products. I went to visit them last month and it was a neat trip. Fasten your seat belts everybody, we’re getting a nice stationery collection ready that’ll be out in a few days!
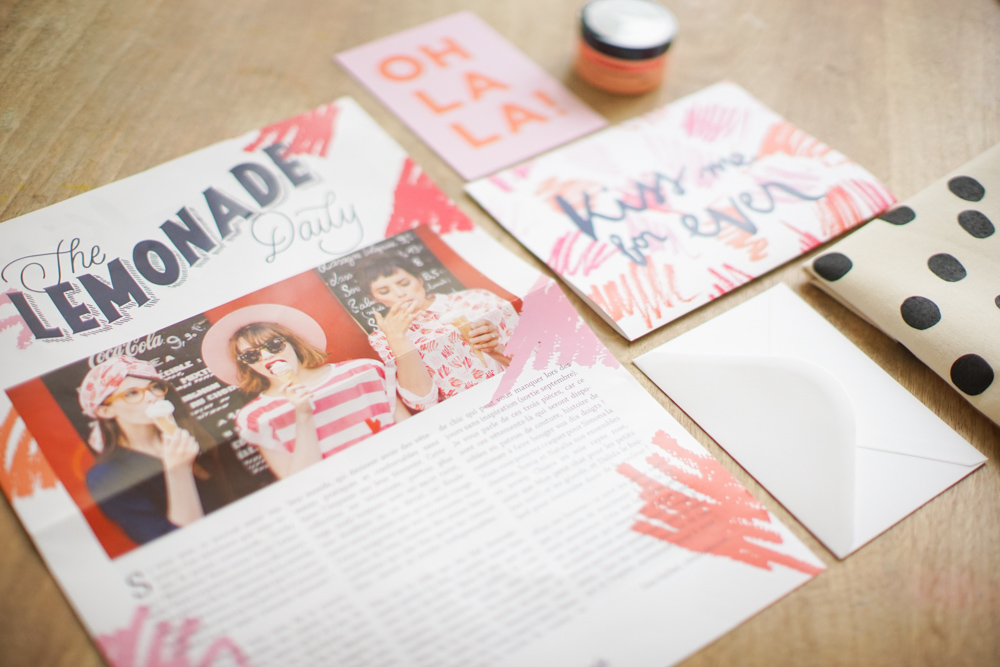
Going back to the package experience, your happiness is important to us and we’d like to thank you. When you order online, of course this isn’t news to you, but it can be unclear since you’re buying something based on a picture. When I order online, and I get it in the mail, it’s like buying myself a present since it’s all wrapped up and it’s a surprise to see if what I ordered meets my expectations! It’s important that you get a neat package, since if you’re taking a leap of faith and ordering something from us, this is my way of thanking you for trusting us...
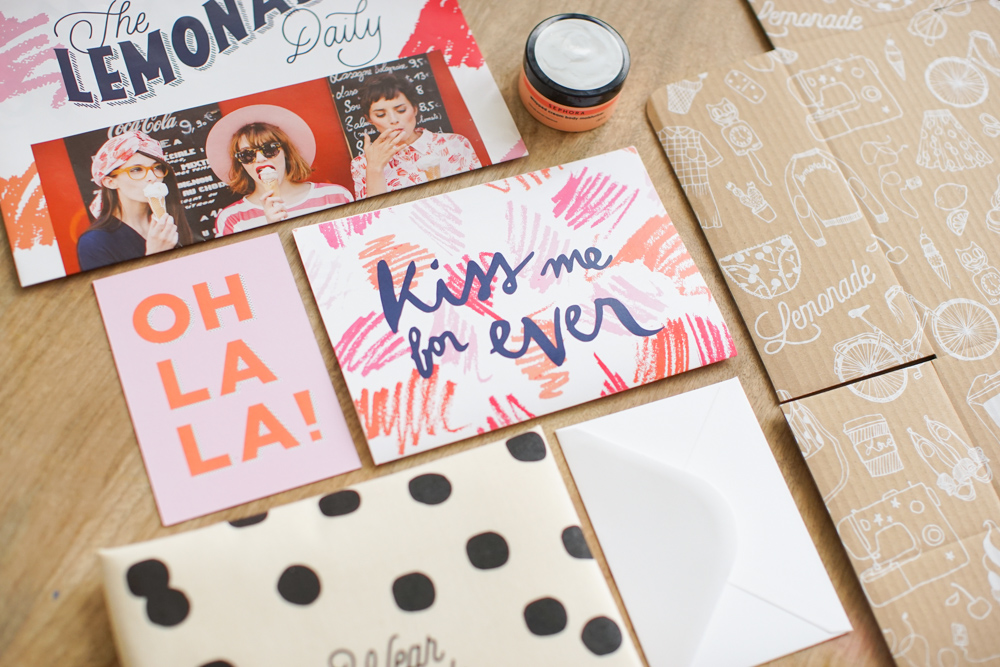
Since the new collection came out, we’ve collaborated with pros on the package experience, Moo.com. Together we came up with the idea to do something a little more special than simply printing the invoice on white paper. We added something nice to say to the back... Aside from an invoice in every order, you’ll find a postcard to thank you with a discount code for your first Moo order! I hope we can keep working together on future collections, since their products are
high quality. I had my cards made on their website and I’ve gotten so many compliments! Really, give them a try, you’ll be blown away by the quality of your order!
Anyways, there’ll also be a tote bag in your package (that’ll soon change styles)... and our Daily Lemonade with a little, exclusive DIY inside and pictures of the collection. Plus, in celebration of Dita, the first 300 orders will get a little jar of melon scented Sephora cream!
Anyways, I love my job. Sending hugs and kisses your way!
 Translated by Whitney Bolin[:]
HAPPY FROZEN SUNDAY[:]

Happy Sunday everyone!
Ice cream week came and went... I really hope you liked it! It’s always fun for us to come up with content centered around a given theme. Ah, the constraints that make us creative... is there a theme that you’d like to see done? I’d really like to do a special ‘Think Pink’ week, not about the singer of course... but the color! A tropical week could be neat when winter is in full swing, or even just a Tropical Christmas? I’d like to do another polka dot week too, better than the first one, three years ago... and even a striped week! I can tell you that I’m already getting a special week ready at the end of September that should be to your liking! But I’d love to know what you’d like to see, I’m sure everyone can come up with some crazy ideas!

I’m wearing a white linen culotte, a sequin tshirt and Gordana Dimitrijevic shoes from my wedding, and a homemade pink headband...
I’ve already told you about what’s going to happen next without telling you about today’s post! That’s so me, putting the horse before the wagon... so today, I’d like to finish off this theme week with a unique shoot, me balancing on modeling clay ice cream cones... I’ll let you look it over...
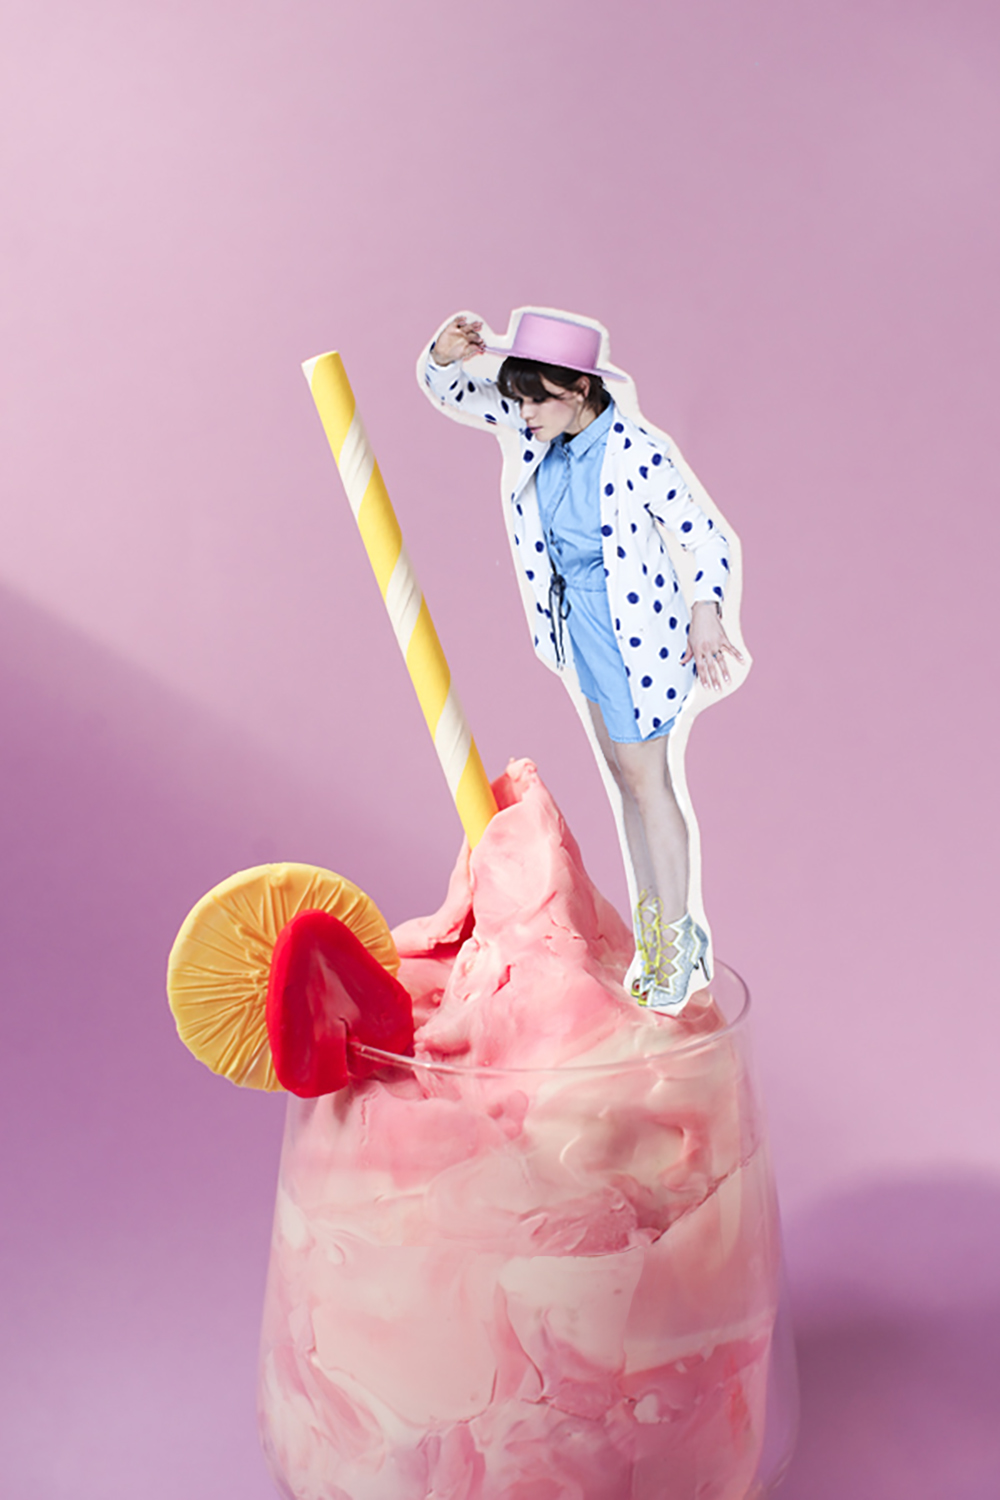 I’m wearing a romper and a polka dotted Asos jacket, as well as a Wear Lemonade hat that’ll be available midAugust and my Gordona Dimitrijevic shoes.
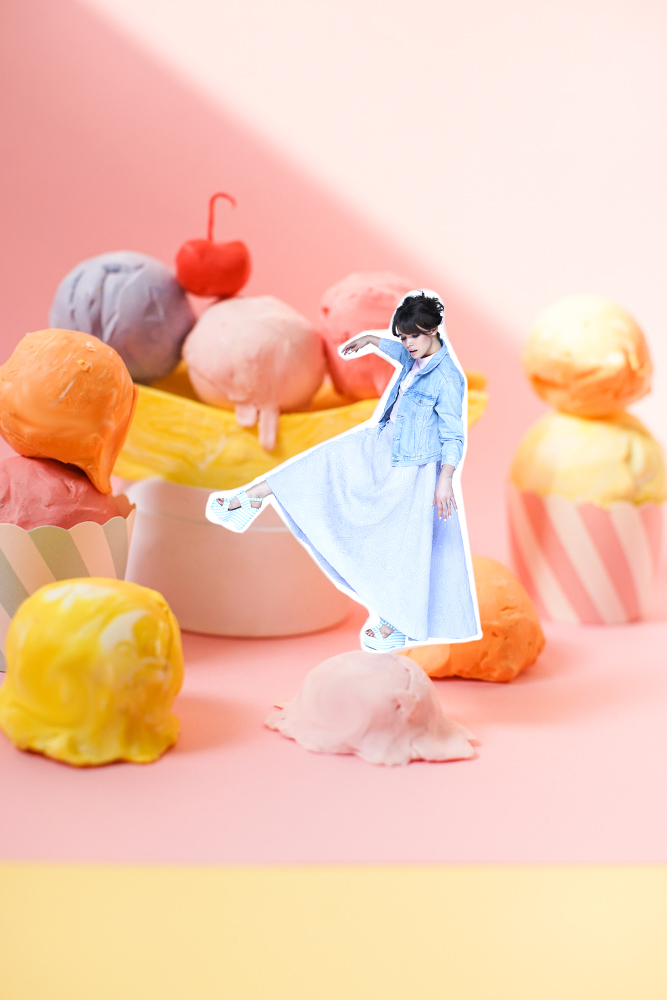
Here I’m wearing an amazing lilac skirt, a babe tshirt and a jean jacket with Mellow Yellow shoes. I wasn’t just going to wear hokey ice cream patterns, I thought that ice cream was more about sugary sweet, pastel colors. I was lucky to have Asos along for the ride and they loaned us everything used in the shoot. Once we finished shopping, Pauline Darley came along to photograph me on a white backdrop in her new photo studio! The idea was to mix up pieces as I often like to do, with a summery romper and a polka dotted blazer. Or a maxiskirt with a middle school tshirt and a jean jacket... We’re not repeating ourselves, I like to “upgrade” certain pieces to make up my outfits.

My lovely friend, Alexandra B., who besides being one of Wear Lemonade’s longlocked muses, is also a talented set designer that makes decors out of modeling clay... see where I’m going with this? She’s so good at her work that a few weeks ago she started an incredible wallpaper eshop: papermint! I told her about my desire to do something new for an outfit shoot... and voila! One evening we mixed pounds of clay to get pretty pastels... we underestimated the amount of work needed to make all of these backgrounds. We had time to make the ice cream cones before our schedules caught up with us... So yesterday, when I got back from vacation I continued mixing so we could finish this theme week up right!
 A little close up of Italian ice cream!
 Behind the scenes with pastel tennis shoes...
Writing you this and seeing the ice cream, which is obviously fake, is making me hungry. I’m going to go grab a bite and try out some of the places Simoné went to! Hugs and kisses! Thanks to Pauline Darley and Alexandra Bruel for their talented help and to Asos!
 Translated by Whitney Bolin[:]
DIY ICE ICE NEON[:]
 Hello my darlings!
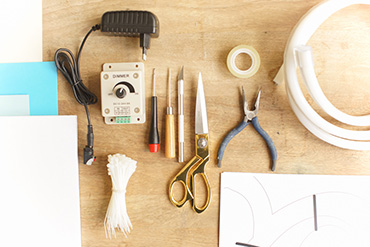
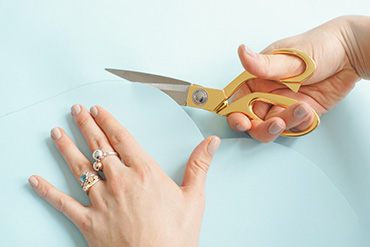
I hope that this theme week still makes your mouth water! There won’t be a Happy Friday today, I’m holding onto a sugary sweet outfit to top off the week on Sunday! Today we’re going to do a neon light ice cream DIY! I’ve wanted to make this for a while but I didn’t want to do any projects with intense electric work. Technology has made creating a neon effect available to everyone, not like LEDs that are little lights every 5 cm, this is more of an authentic retro neon light like everyone loves! Hallelujah for all DIY fans! After sifting through information online, our Charlotte found the holy grail of lighting at Dream Neon. Besides having really easy to use fluorescents, their team is super nice and will point you in the right direction if you have any questions! So let’s get started, go wild! I can’t wait to see your homemade neon lights! Hugs and kisses and see you tomorrow... Simoné will tell you where to find the best ice cream in town.

For this DIY you’ll need:
- The ice cream pattern, download here
- Flexible neon lights, about 3m to make the entire ice cream, as well as a power cord and a connector jack (we found everything at Dream Néon),
- Tie wrap
- Tape
- Scissors
- A good box cutter
- A punch
- Electrician’s screwdriver
- Electrician’s tape, white
- Glue
- Wire cutters
- Large sheet of foamcore cardboard (A0 format)
- 65x50 cm sheets of colored paper


 Day...
 Night !
 Translated by Whitney Bolin
[:]
ICE CREAM : WHERE TO EAT SOME IN PARIS[:]

Hey guys!
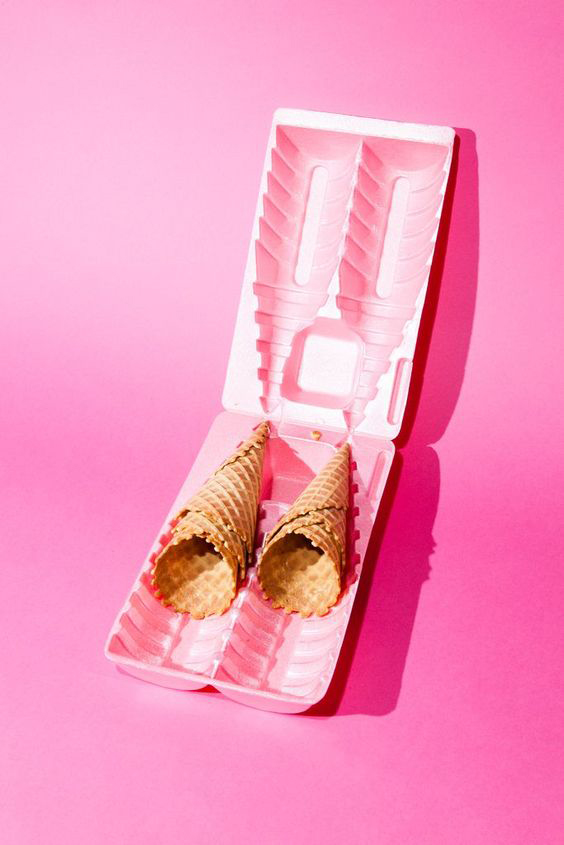
Some days at Lemonade Studio are harder than others. Going around to different ice cream shops in Paris with Charlotte was obviously a difficult day. And yes, I did get to catch some Pokemon on the way. We got up the courage to try several ice cream places, after choosing a few online. The good news for you is that we won you some, check it out below for more information. First stop: Amorino, pictured above, with their famous flower shaped ice cream cones. We got LemonGinger. The ginger was... different...
 La Crème de Paris, 4 Rue du Faubourg Montmartre, 75009 Paris – Their boutique is pretty neat, besides the ice cream, their stuffed crepes caught our eye. Raspberry flavor. We had to keep some room for more ice cream. Next time we’ll rate those.
 À la Mère de Famille – 35, Rue du Faubourg Montmartre 75009 Paris – ‘Paris’ oldest chocolate maker. Since 1761’ as they say on their website. The inside is beautiful, you’d think you were at Honeydukes. We tried their mango flavor, it’ll knock your socks off !
Melba Glacier, 31 Boulevard Bonne Nouvelle Paris – The typography on their storefront will remind you of something! Blood orange flavor. They’re super welcoming, the store is colorful and the ice cream is great. What more could you ask for?
 Pozzetto, 39 Rue du Roi de Sicile, 75004 Paris – Of course we had to get chocolate ice cream, we couldn’t pass it up.
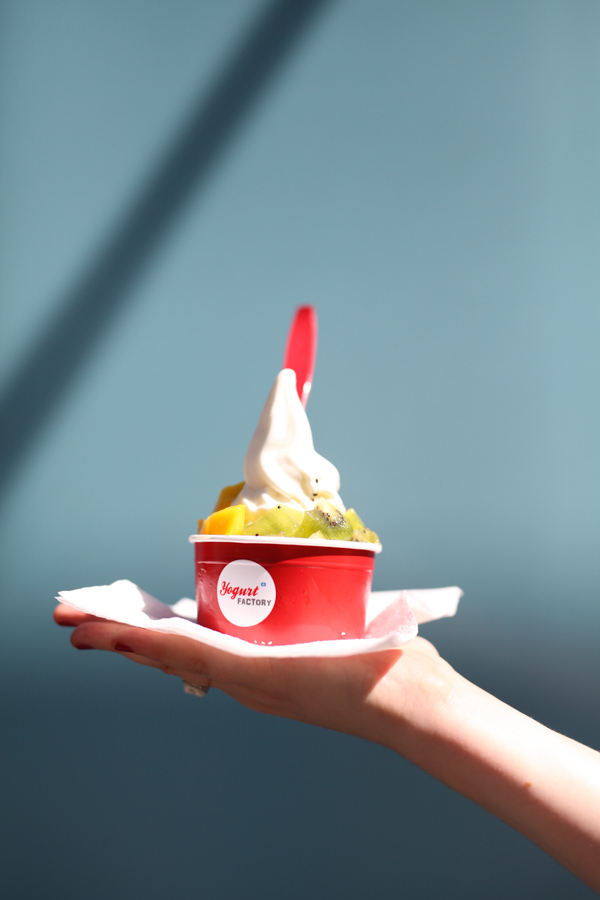 Yogurt Factory! Everyone knows how it works: frozen yogurt, fruit, and toppings. It’s a refreshing treat, as they say on Top Chef.
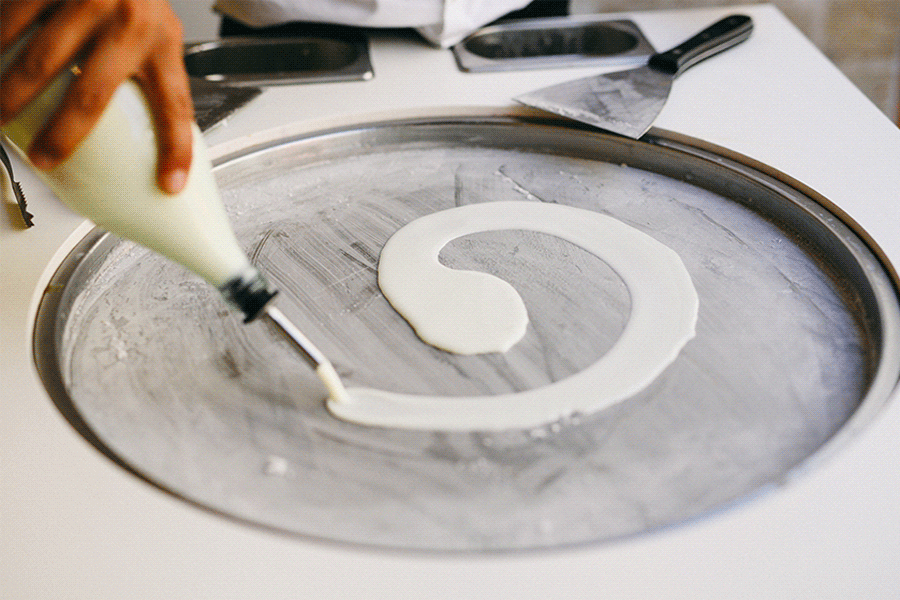
Ice Roll, au 7 Rue de Turenne, 75004 Paris – Ice cream rolled right before your eyes. It’s almost hypnotising to watch how they scrape the pan with their little spatulas. The end result is beautiful of course.
This list isn’t complete of course, there must be other good ice cream shops in Paris. Let us know of your favorite places in the comments!
 Une Glace à Paris, 15 Rue SainteCroix de la Bretonnerie, 75004 Paris – Matcha flavor!
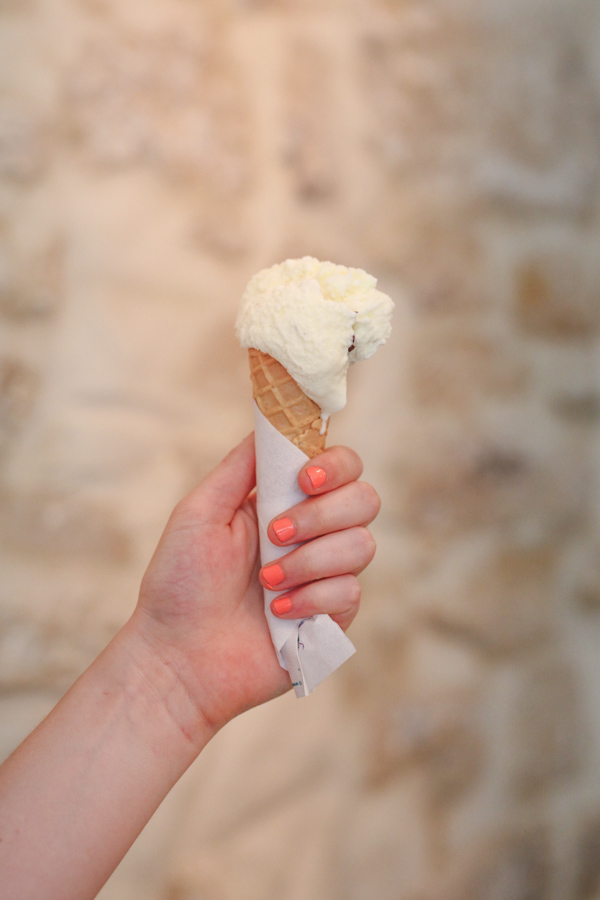 Pastelli Mary Gelateria, 60 Rue du Temple, 75003 Paris – Classic, stracciatella flavor.
 Amazing ice cream cookies from Jean Hwang Carrant! They’re incredibly delicious. You can taste his creations all throughout August at L’Exception aux Halles!
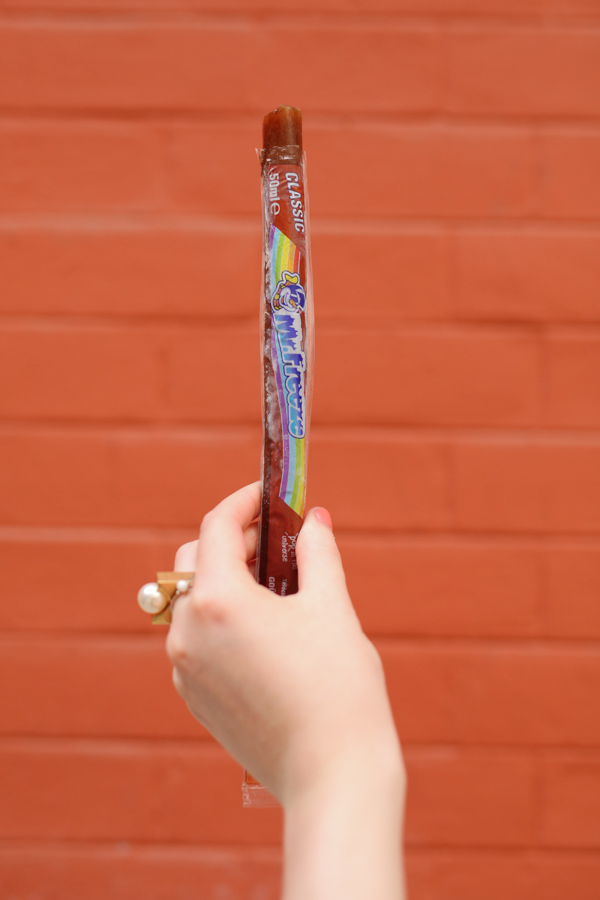 Finally, you can’t miss: Mister Freeze! I won’t give you an exact address... it’s not exactly ice cream but we still wanted to include it. Personally, I’m on the OpenItWithYourTeeth team, scissors are always too far away. What about you? Olitax
ICE CREAM MOCHIS
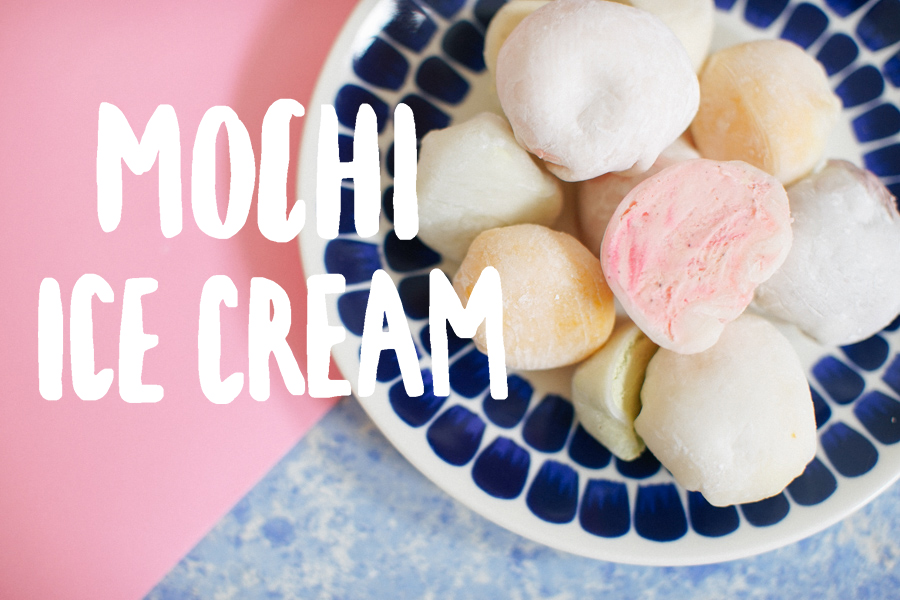
Hello my darlings! We’re moving right along this week with a recipe near and dear to me! So just what are frozen mochis? I showed you guys how to make classic mochis, but these aren’t anything like those! I’m crazy for mochis! My other half likes to say that if I could only take three things on a desert island, I’d take an avocado, a pair of wedge espadrilles and mochis and be in complete bliss... But seriously, this is a Japanese dessert: a scoop of ice cream surrounded by a thin layer of dough made from sticky rice flour. Since the dough seals it off and the ice cream is much colder than it, it’s a shock to the taste buds. The ice cream melts in its’ little rice pocket and it’s so good.
It should be eaten with a little spoon for those who are feeling fancy and to keep you from gobbling it up like me! We even made you a little video!
Hugs and kisses, Charlotte and I will see you tomorrow with a special playlist!
To make about ten mochis, you’ll need:
- Ice cream, choose your favorite flavors,
- Cornstarch, there isn’t a specific measurement, but use a large quantity
- 20ml orange blossom water
- 160 ml water
- 120 g rice flour
- 60 g sugar
- Plastic wrap
 First, make balls of ice cream ahead of time because it’s very very important that they’re extremely cold when you’re putting it all together, especially since it’s been so hot out! I recommend making balls of ice cream with a scoop and then putting them in a muffin pan so that they don’t mix and to let them chill in the freezer for a few hours or the night before! Making mochis is serious business, I wouldn’t want you to be disappointed... since the ice cream is now scooped and cold, we’ll move onto the super simple rice dough. In a large, microwavesafe bowl, mix the rice flour, sugar and orange blossom water with a whisk. The mix should become liquidy without any lumps. Cover the bowl with plastic wrap and put in the microwave for one minute on maximum power. Using a wet spatula, mix until rubbery. Recover with plastic wrap and put back into the microwave for another minute. Be careful not to burn yourself when taking it out, it should be done: it should be sticky and there shouldn’t be anymore liquid. If there is, put it back in the microwave for 30 more minutes, don’t forget to mix it before hand.
Unroll baking paper and generously sprinkle cornstarch using a sieve. Flatten as thin as possible on baking paper using a rolling pin covered in cornstarch. Place a baking sheet underneath and put into the fridge for 30 minutes.
Once the time’s up, take off the baking sheet and cut out circles using either a large cookie cutter or a knife and bowl. The circles should be about 12 cm wide. On a plate covered with plastic wrap, lay out your first dough circle powdered with cornstarch. Do the same for the others and separate with plastic wrap between each circle. Put everything in the freezer for thirty minutes, we’re almost finished! Once the dough is cold, we’ll get started on the mochis!
Get out the ice cream and put a scoop in the middle of your dough circle, take it all as well as the the plastic wrap that separates the dough from the next circle. Fold the rice dough around the scoop of ice cream, wet your fingers so that the dough is sticky and to help close up your mochis. Close them all, twisting the plastic wrap between your fingers and put into the freezer for an hour before serving. Repeat with the rest of the dough and ice cream, enjoy!
 [:]
[:]
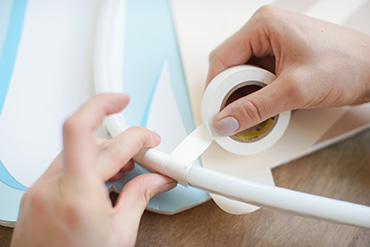
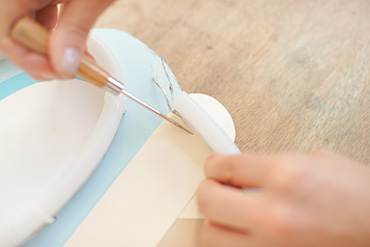
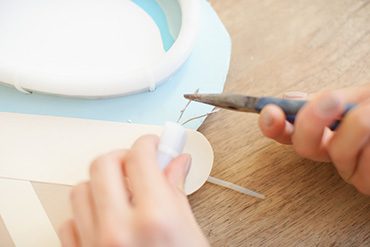
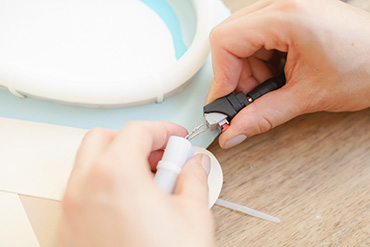
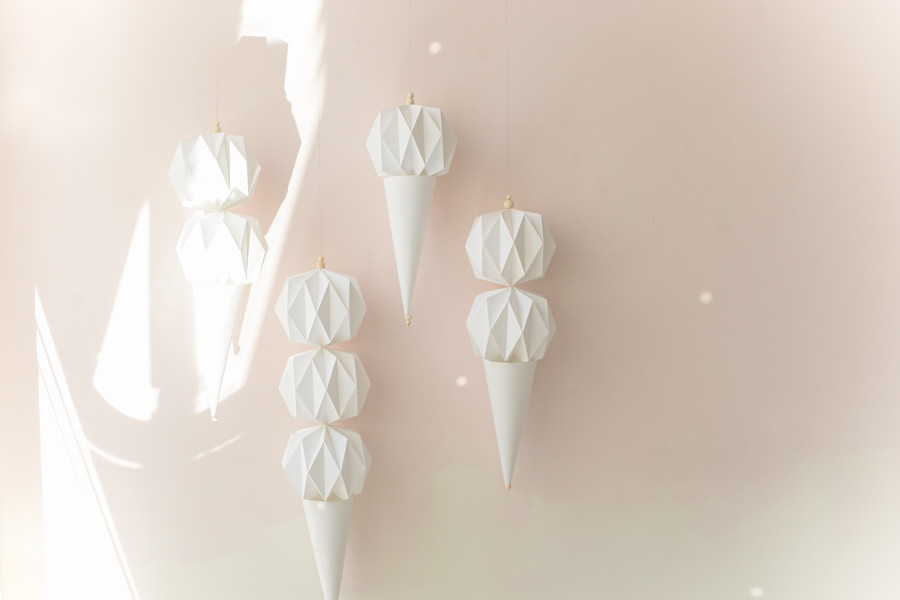
DIY ICE CREAM MOBILE
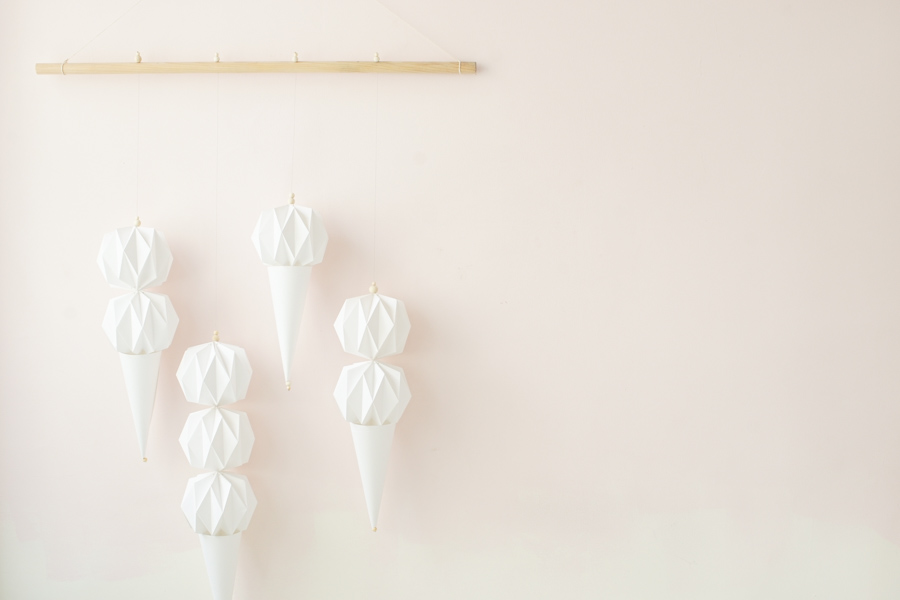
Hello my darlings!
We’re kicking off the week nice n’easy with this DIY... a paper mobile that’ll keep you busy during these long, hot days! It’s a little bit tedious but the end result is so beautiful! You can use it to decorate a colorful wall or as mobile for a baby shower present if you make smaller ice cream cones...
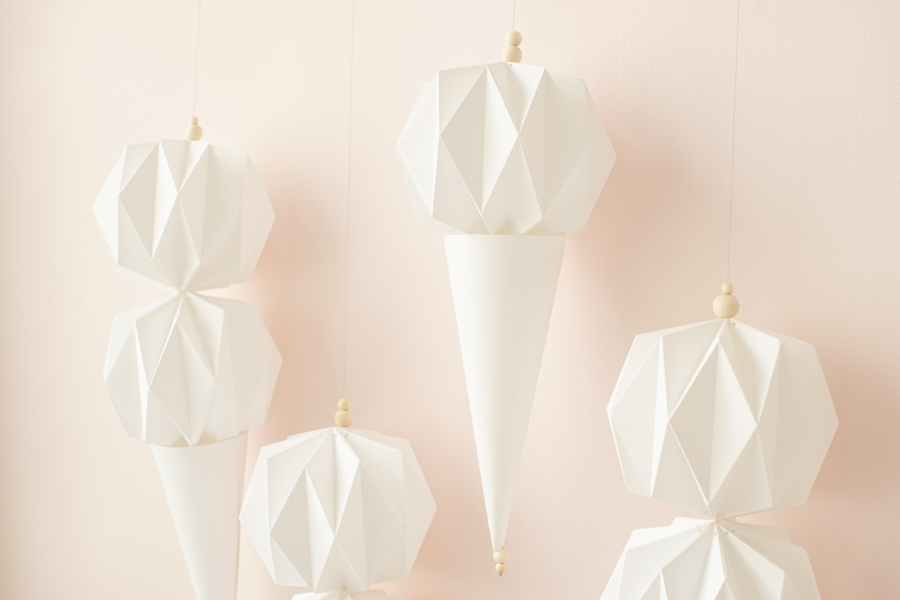
For this week’s theme, we really went wild with decorations, you’ll see more later on! I’m sure you’ll like it! Most important of all, have fun! For this project, we wanted to make something light and airy, all white tones with wood accents, but it’s up to you to make your mobile with flashy or pastel colors and even with stickers as toppings! We can’t wait to see what you make!
Hugs and kisses, see you tomorrow with a recipe for frozen mochis... (oh yes, you read that right!)


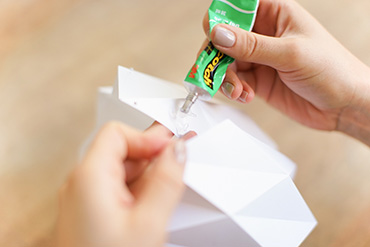
For this DIY you’ll need:
- A drill
- The folding pattern to help understand,
- A wooden rod
- String or ribbon
- Strips of white paper, 60x20cm,
- Punch pliers
- Crimping beads and hanging wire
- Wooden beads, different sizes
- Glue
- Scalpel
- Scissors
- Small ruler
- White wire and a needle


Use scissors to cut between lines 19 and 18, as shown on the pattern, following the folds! Let’s move onto the holes that will keep the ball closed. The line that you traced at 1cm will be your guide (looking at the pattern will help you understand).


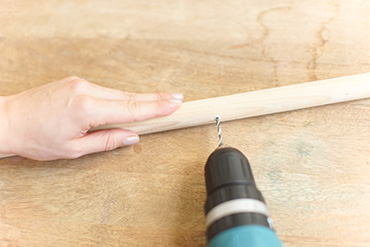
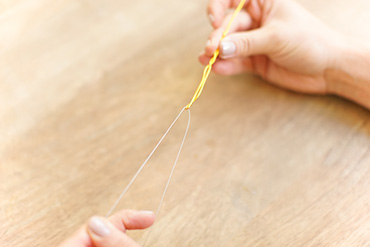


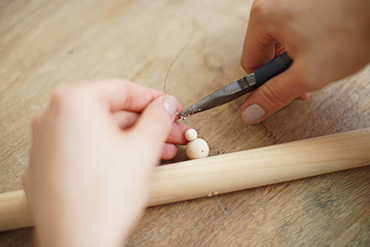
Finish it off with two wooden beads! Hold in place by threading the hanging wire and two other beads through the wooden rod and use crimping beads to hold it in place! TADA!
 [:]
[:]
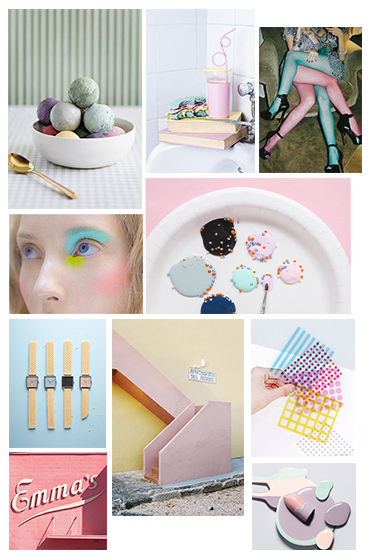
ICE CREAM WEEK INSPIRATION #1
Happy Monday my darlings,
I haven’t said anything these last few days on the blog after the tragedies in Nice and Turkey this weekend. I admit I feel tired and very sad. I don’t want to get used to these disasters, I don’t want to keep quiet, I want to continue to ‘live’. I don’t want to learn to live with this sword of Damocles hanging over our heads either, but all the same, this feeling of deja vu is awful. I don’t have any answers, but when times are hard, I like to do what makes me happy: create and share. So here we are, we’re going to keep doing things and sharing our inspirations...

This week we had planned on telling you about a theme that we love: ‘ICE CREAM’. Pastel colors, sugary sweet, light and happy... I hope it’ll do you some good. I know that I often say this, but it holds true now more than ever: if you’re artsy, feeling down and in need of inspiration, I recommend, no, I prescribe 20 minutes on Pinterest each day. And so you don’t get sucked into the internet, set an alarm and when 20 minutes are up, put your hands up in the air! Your left brain will thank me... Hugs and kisses, you can see more of these pictures on our Pinterest account’s ‘Ice Cream’ board. By the way, remember when I loved ice cream three years ago...!
What about you? What does ice cream make you think of?

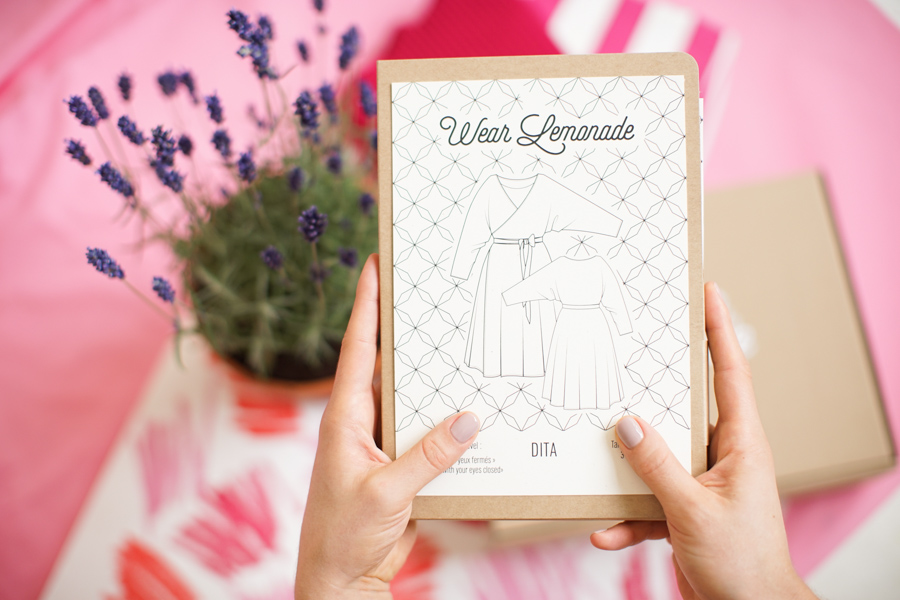
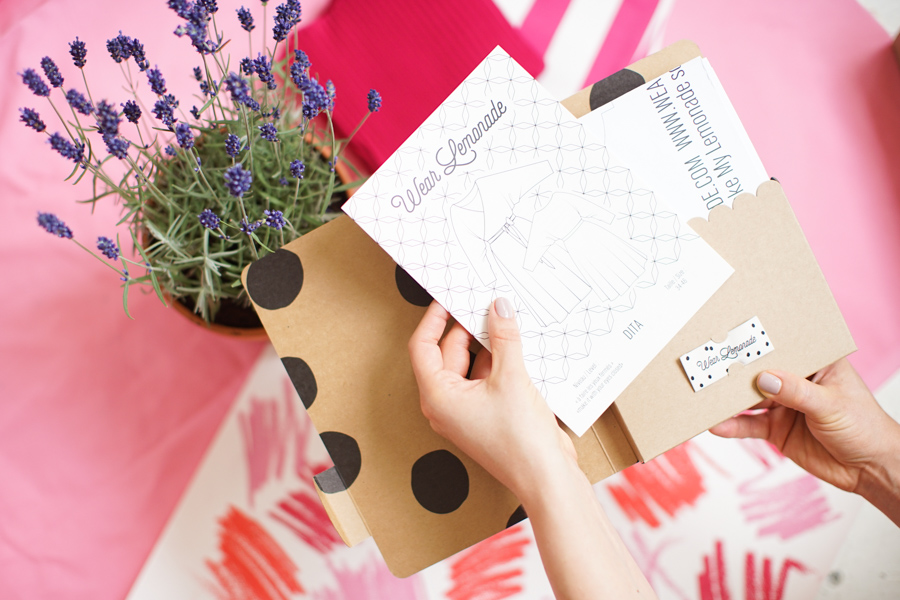
HOW TO SEW A DITA DRESS[:]
Hello my darlings!
I think you’re gonna be happy! Like I was saying yesterday, it’s been awhile since I was this excited about a Wear Lemonade piece! Of course I love all Alines, but Dita has got it all! I’ve already said it but I think I’m going to keep this dress for a long time... it’s the first pattern from the “Kiss Me Forever” collection, we’re going to bump up the sewing difficulty level! Not to worry, everything’ll be fine!
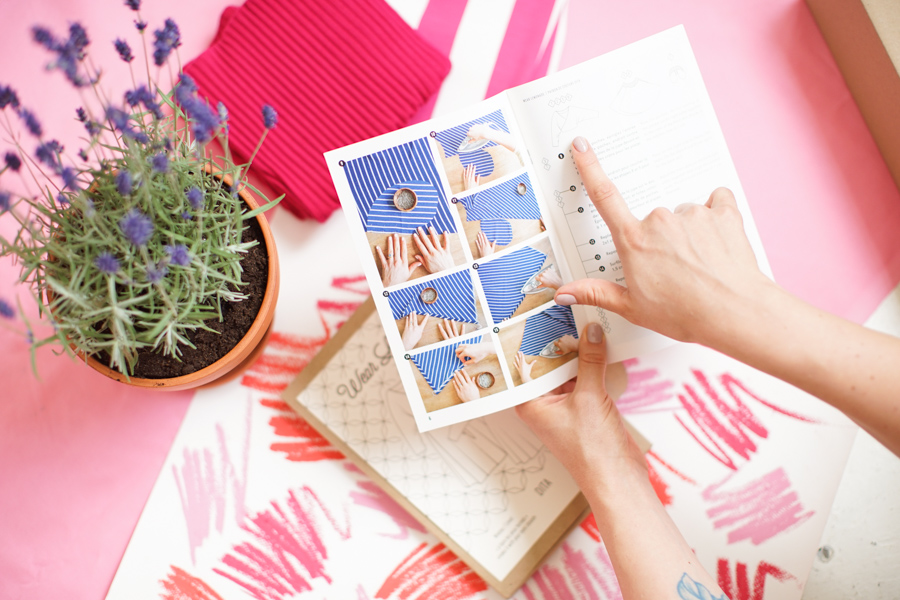
To start off with, it has a crossover wrap, as soon as I can find clothing with one, I buy it, it’s so rare, I’m starting a nice little collection of my own! Plus it looks good with the crossover in the front or back! This is why it has a long belt so you can knot it on two sides. Dita has fitted batwing sleeves, you’ll see right away why I’m in love! The cherry on top is that Dita has pockets and a skirt that spins! There you have it, my declaration of love... I already have all three colors in my suitcase, ready for vacation. Take a look at the video, you’ll see that I get right to it!
A few technical things about Dita :
- To make it, you’ll need 3 m of fabric from a bolt measuring 1m45 wide
- 2 m of bias to make a neat neckline if you want to go crazy with bold colors
- As for the quality of the materials, we suggests you use a viscose, silk, or crepe fabric, or even a light and soft poplin, which can actually be pretty flowy!
- The paper pattern is available here or as a PDF via a 3, 6, or 12 month subscription, here.
 Remember to share your creations and questions on our community page and on social media with the hashtag #DIYwearlemonade! See you later![:]
WEAR LEMONADE COLLECTION #6

Hello my darlings!
I’m writing you from my bed, the wind whispering through my curtains, the smell of summer is in the air! I have more energy since the sun is back, today I’d like to tell you about the news that’s shook up our lives at the office, the arrival of the ‘Kiss Me Forever’ collection...
Each launch has its’ surprises for me, whether it’s the fourth or fifth one, or even this new sixth collection. I don’t know, this one is special, I’m crazy about it!
I feel like it’s more polished than all the others, that the collections and ourselves are maturing at the same. I think that I like the idea that this collection was created without making any compromises, with bright and bold colors. Even in the more classic pieces, there’s always a fun twist, with a lining, a little heart, a pink hat... and I love the spontaneity of the red lipstick pattern and how it directly correlates with my passion for beauty and makeup.

For Kiss Me Forever, I wanted a crossover wrap dress that can be worn in the ‘front and back’, my friend Justine B. who posed in these pictures came to my house one day wearing her ‘to the moon and back’ sweater backwards. It was so deliberate, I loved this free spirited way to change it up. Justine often does this with her clothes, so I thought that Dita’s crossover wrap was the perfect way to play with different ways of wearing your clothes. I’ll tell you more about the Dita dress tomorrow when the pattern is released... but in addition to being able to wear it frontwards and backwards, it’s flowy, with pockets, and wearing it smooths out its’ wrinkles. I love it. So much that I almost renamed it Lisa!


The other musthave pieces from this collection are the India jumpsuit that’ll come out midAugust and the pink, short Maria jacket that’ll be released in the beginning of September...
There’s also the pink Tara hat and the Simona blouse with a removable ascot tie (the pattern will be in the next collection), as well as Lena and Lila to round out the collection, Sonia the tshirt that was a huge success (it’ll soon be restocked) and the jersey Natalia skirt.
And as a brand, we have to cover everything, from style of course, to constantly looking for new partners and vendors, to prices, as I was saying, to photo shoots’ themes, to the faces that’ll represent the collection, to eshop performances, to customer service and shipping! But what’s great today is that we’re starting to identify different issues that could be problems later and we’re trying our best to anticipate them!
This might make you smile, but this whole thing about shipping is fun and I think that I’m going to write an article for you very soon to explain my point of view and to show you what we come up with every trimester. I’m going to wait for you to receive your new orders so I won’t spoil the surprise!
Take a look at the little clip we made, set to music from the great guys at musicalist, as well as the photos. I read on social media that you would have liked to see the collection worn by different body types, I wanted to have my friends and muses pose, but I’ve heard you. So thanks to Justine B. Alexandra B. and Jade H. as well as Mélanie G. for being our models for the day. Thanks to Martin Condomines for his sunny pictures, to Olitax for this bright lookbook and this video that I’ve watched a thousand times. Thank you to Laurence Maestrello for the fresh and lovely makeup and to Fred for doing hair! Thank you to the Lemonade team, I’m so proud of you!
 [:]
[:]
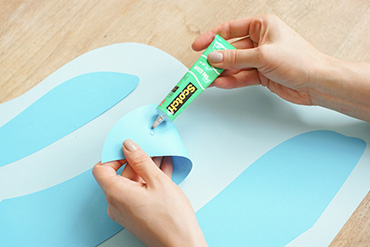
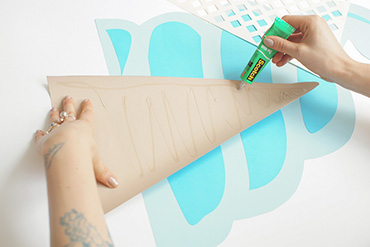
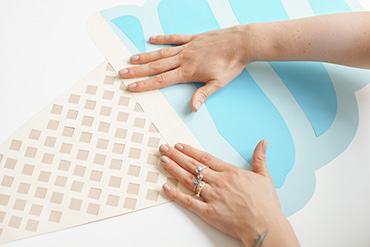
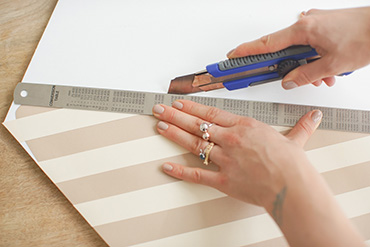
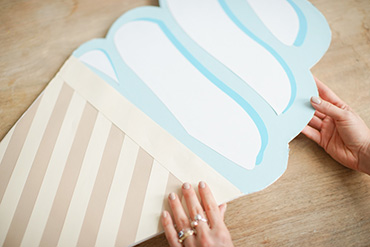
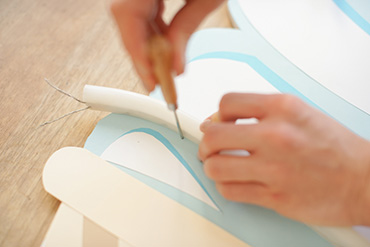
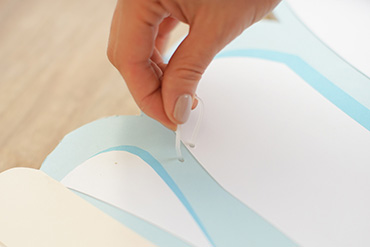
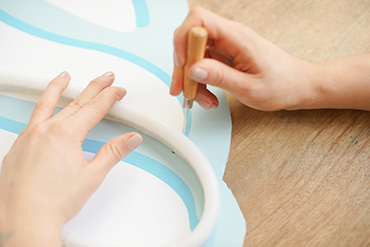
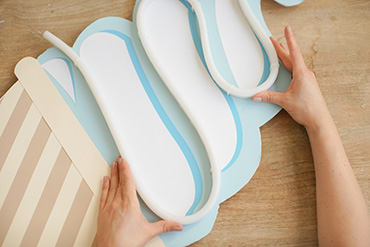
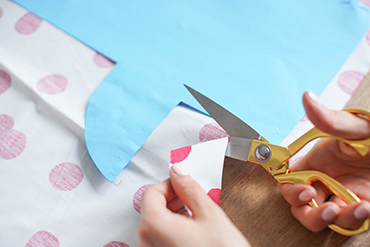
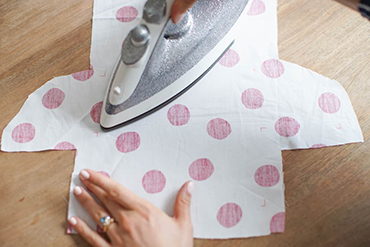
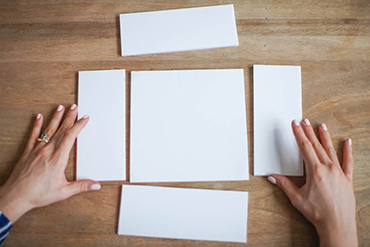
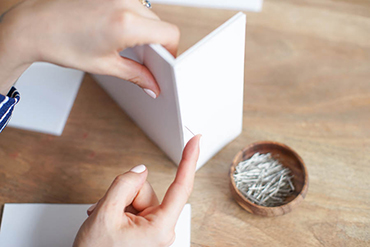
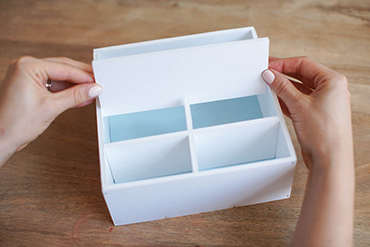
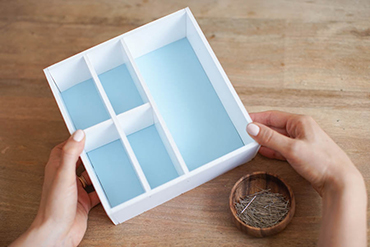
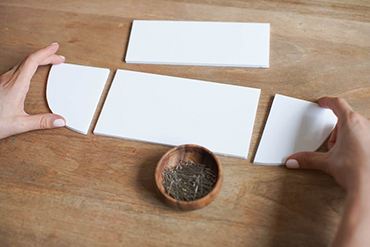
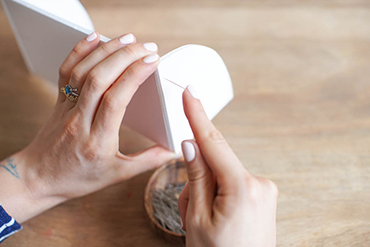
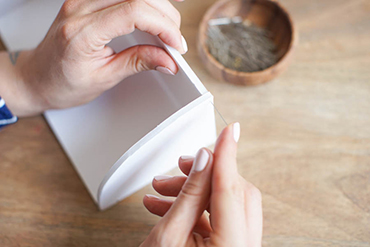
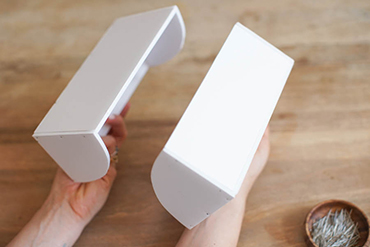
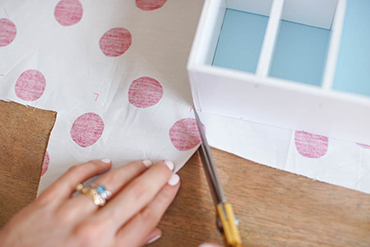
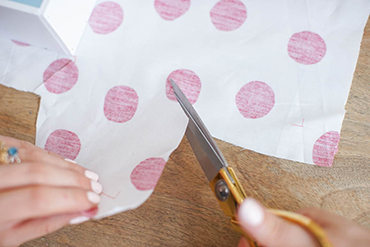
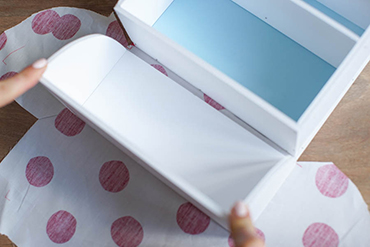
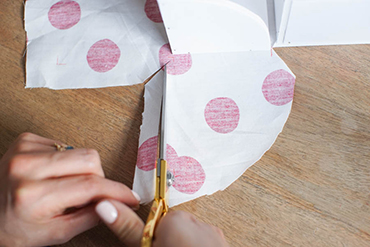
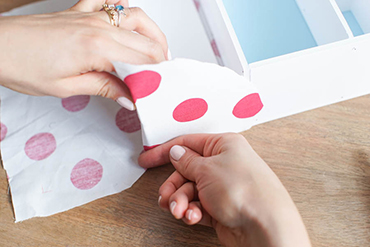
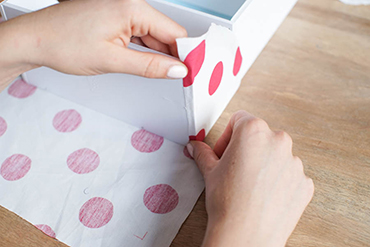
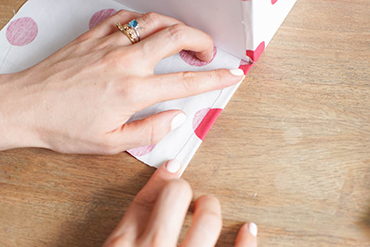
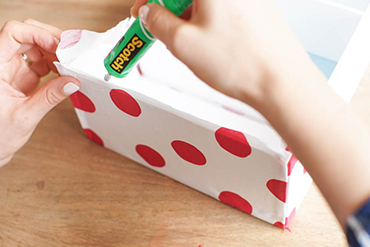
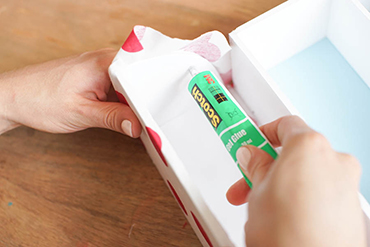
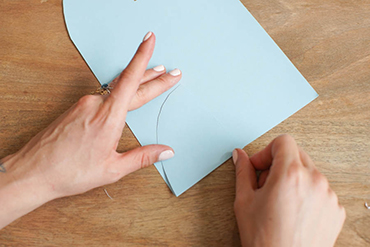
DIY SEPHORA BOX[:]

Hello my darlings!
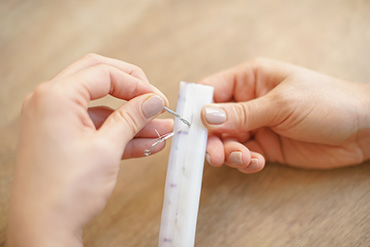
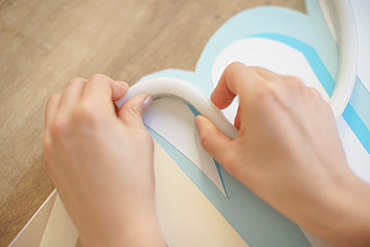
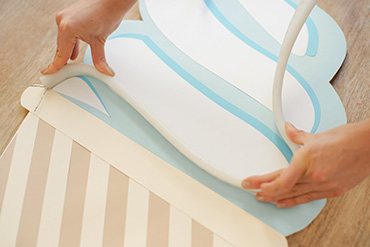
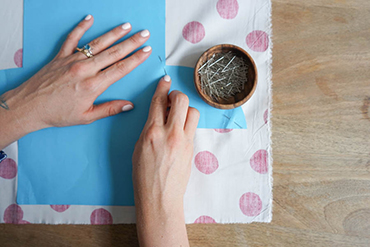
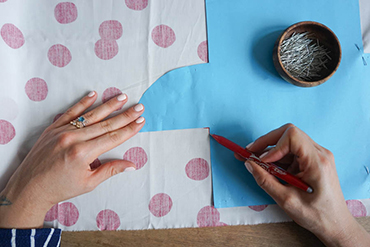
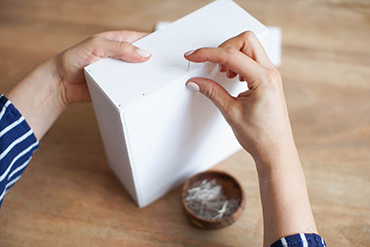
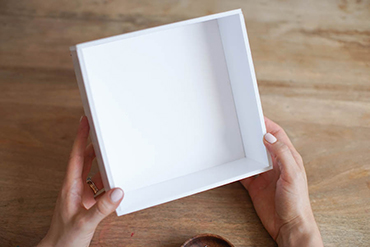
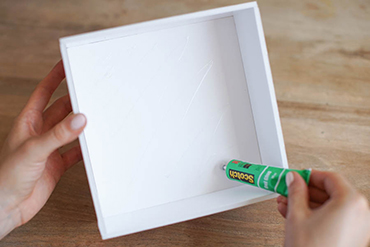
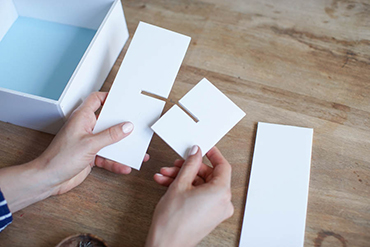
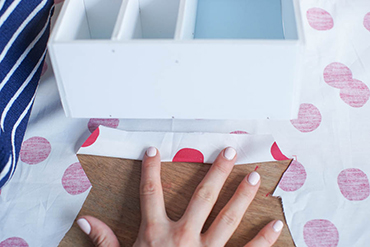
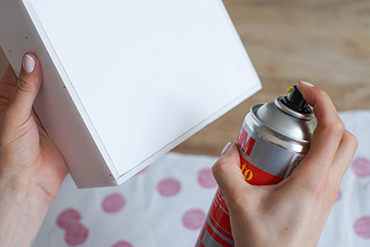
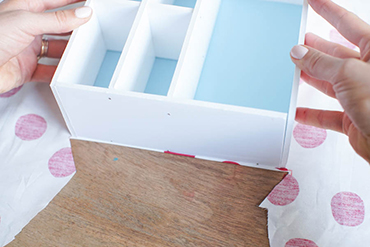
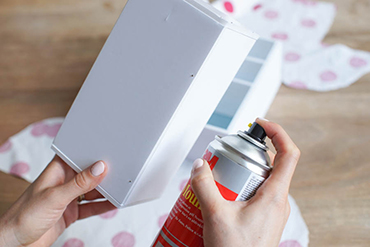
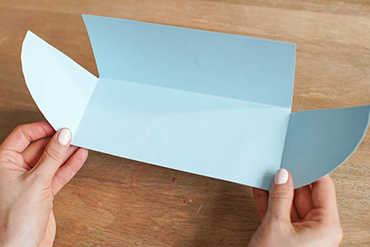
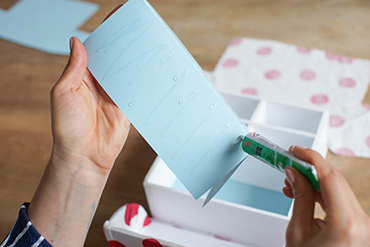
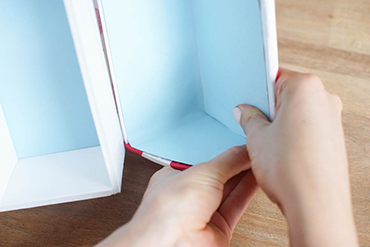
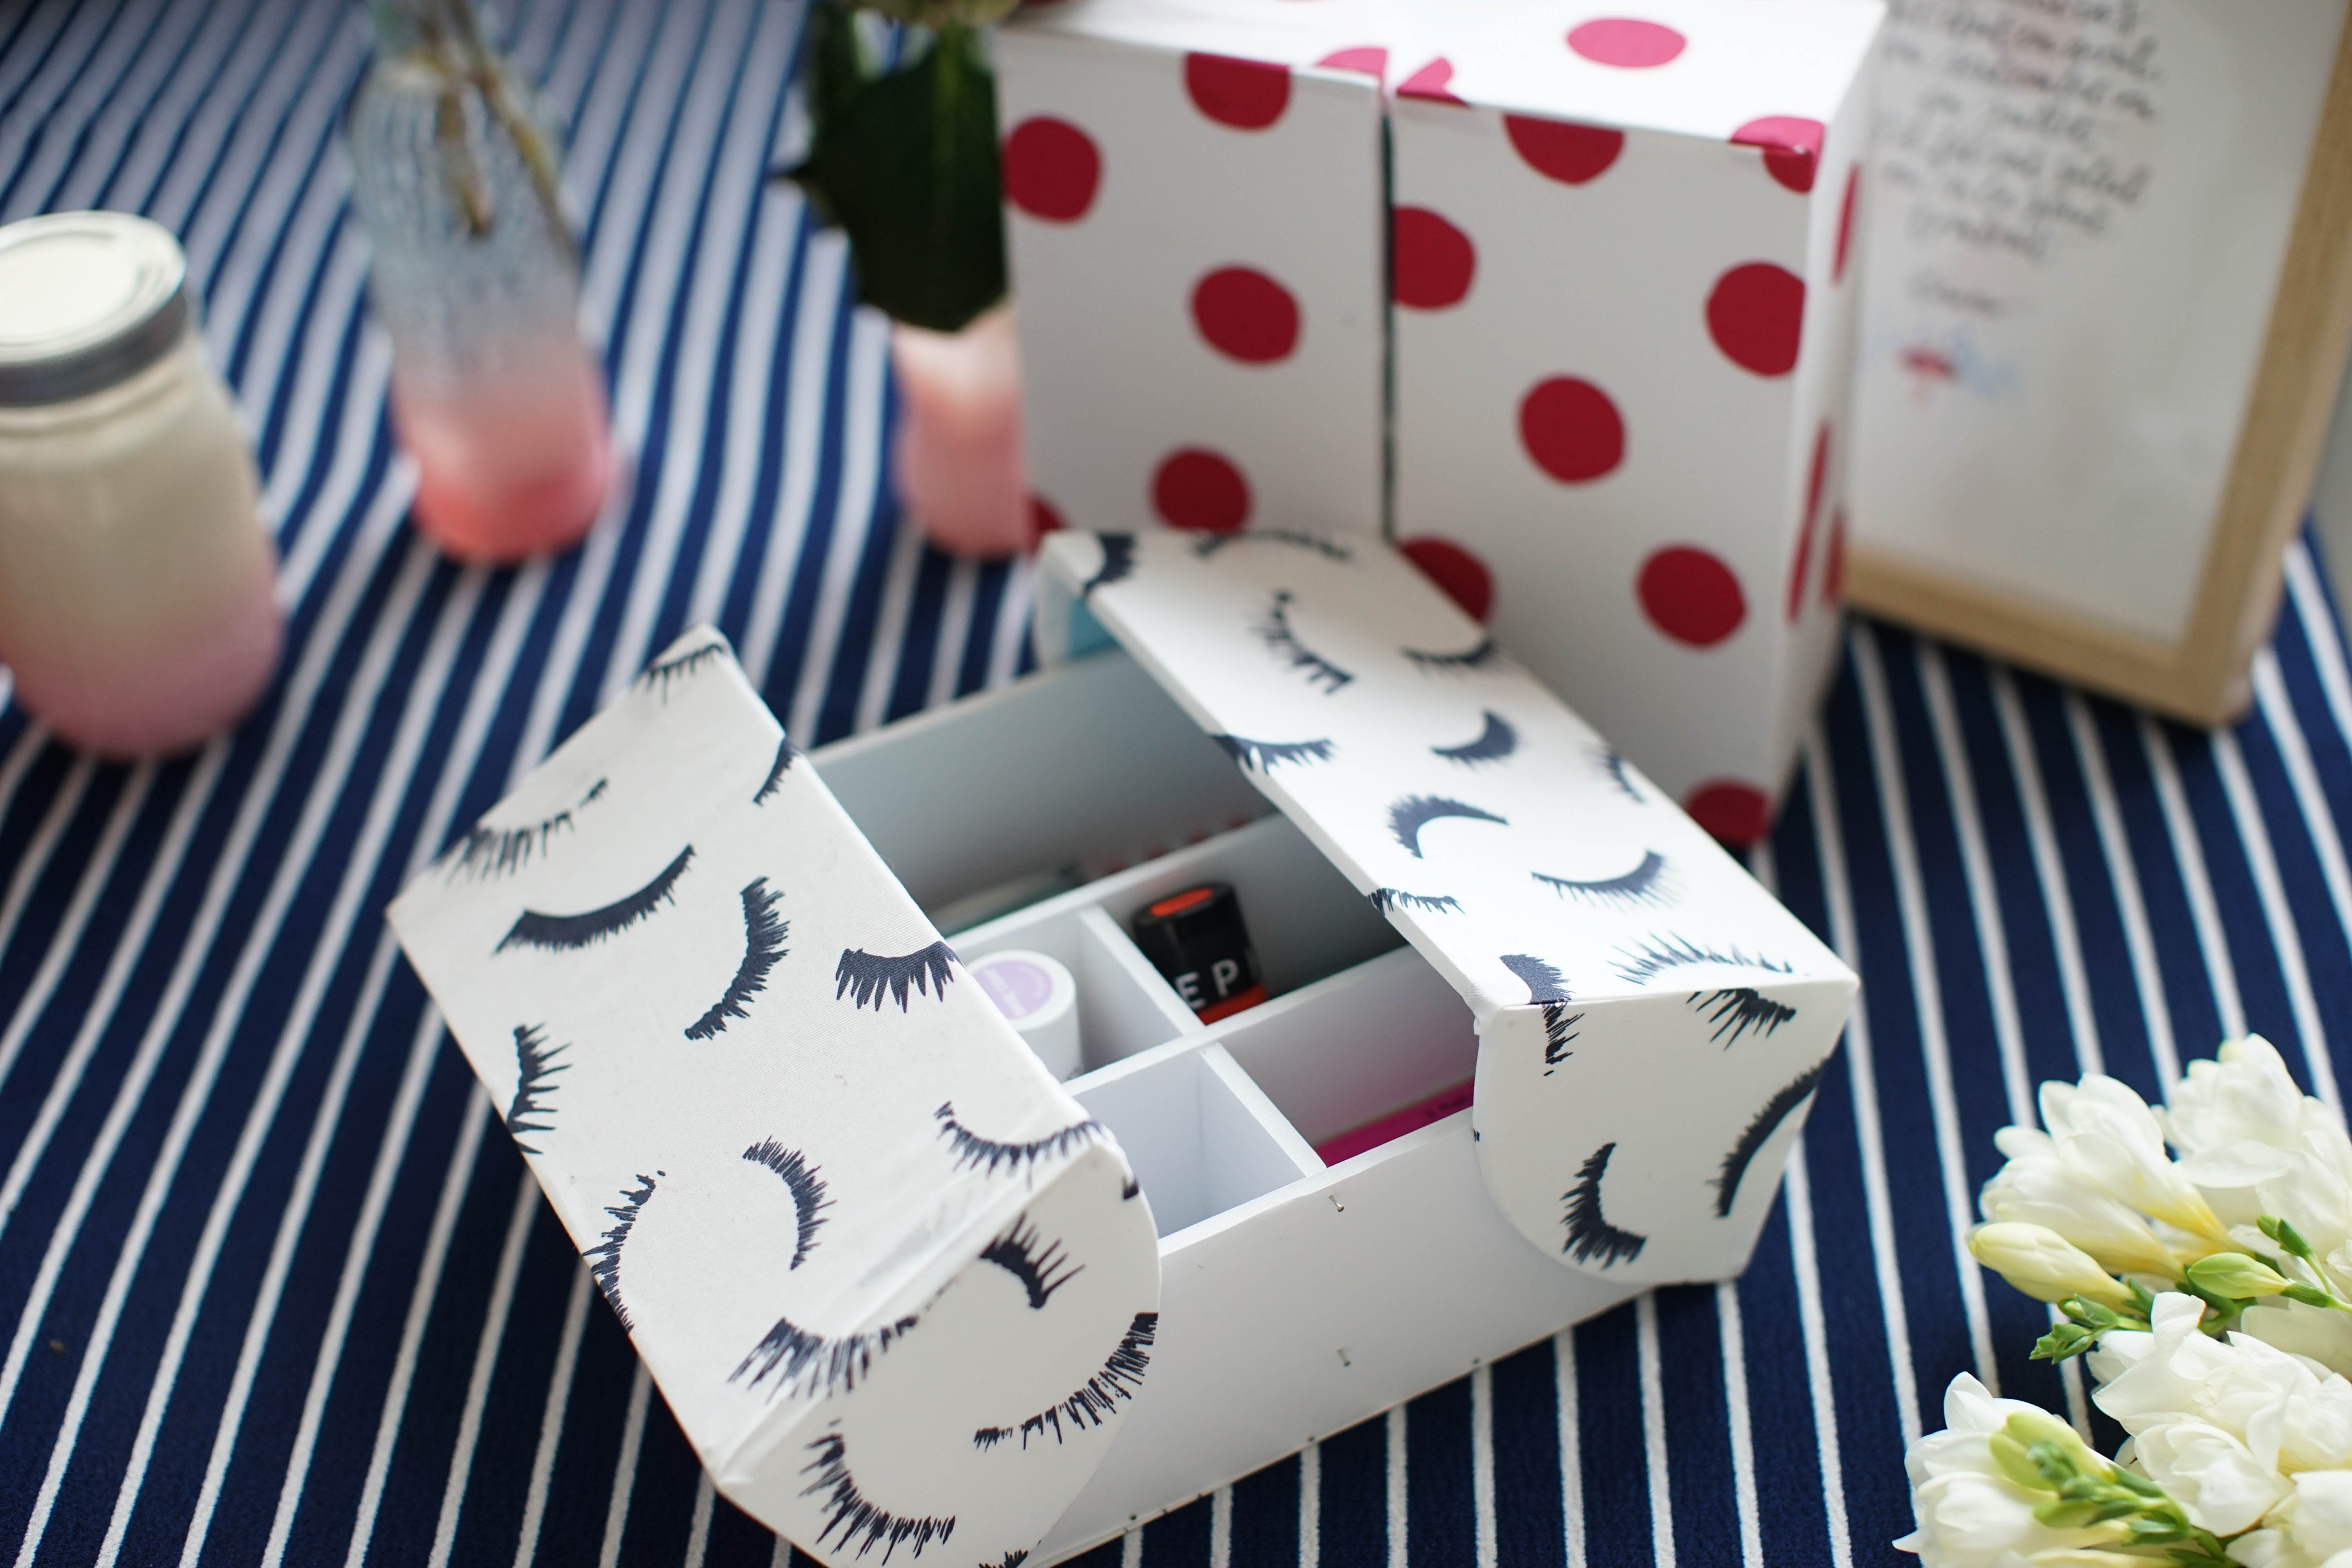
It’s been one week without a single post, what a sin! I won’t lie, things have been crazy. With the new collection’s launch on Sunday and having to prepare content for vacation, we’re overloaded! Here’s a DIY made up today for the Sephora ‘Nail Art’ Workshop. We’ve created it to be super simple for you! It’s a box made out of foamboard and sewing pins that you can store all your manicure tools in. It can even be your toolbox if you change the size, or a jewelry box to make yourself... have fun!
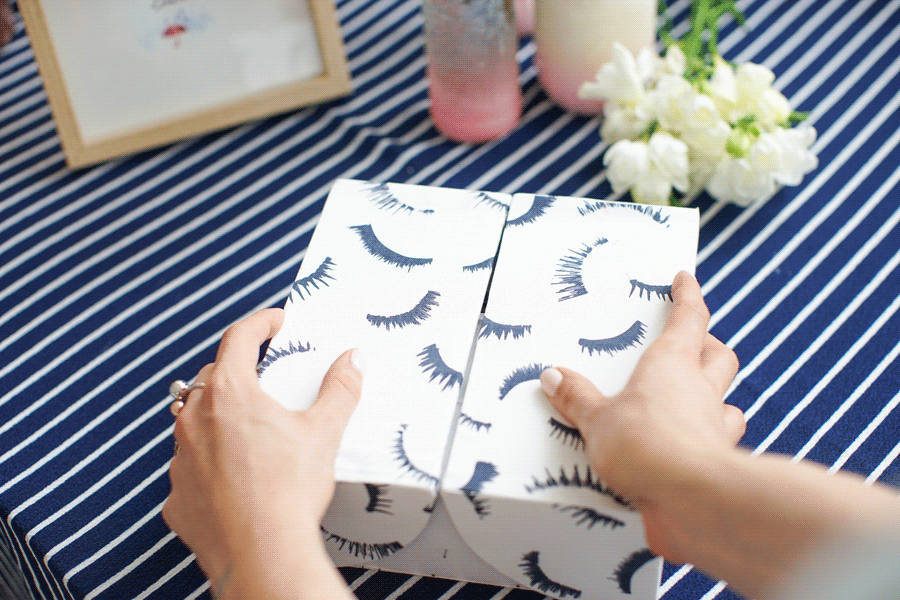
Choose a cute motif to cover your box with, we used one of our prints (of course), but it’s up to you to find whatever combination you like. It’s important to use a fine material that’s easy to work with and that holds up under the heat of an iron.
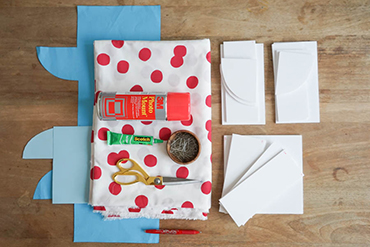
- Foamboard,
- Patterns to download here and here (the second file must be printed on A3 paper)
- A good scalpel
- Sewing pins
- Spray adhesive
- Erasable pen
- Glue from a green tube
- A pair of scissors
- Fabric, this one here is our poplin dots
- Colored paper


 [:]
[:]